
Setting Up a Form
Last updated September 16, 2026
This guide covers the "Setup" tab in the Form Designer, where you manage a form's system information, live/private status, basic information, form configuration (location, lead stamping, success behaviour) and the terms and privacy links. Example shown: the Keystone Lot Monthly Parking form.
The public URL banner at the top of the Designer shows the form's standalone address, <pages domain>/<org short code>/forms/<slug>, with Copy and Open buttons. This is the link to put behind a QR code or in an email when the form is not embedded on a page. The mobile preview on the right updates as you save.
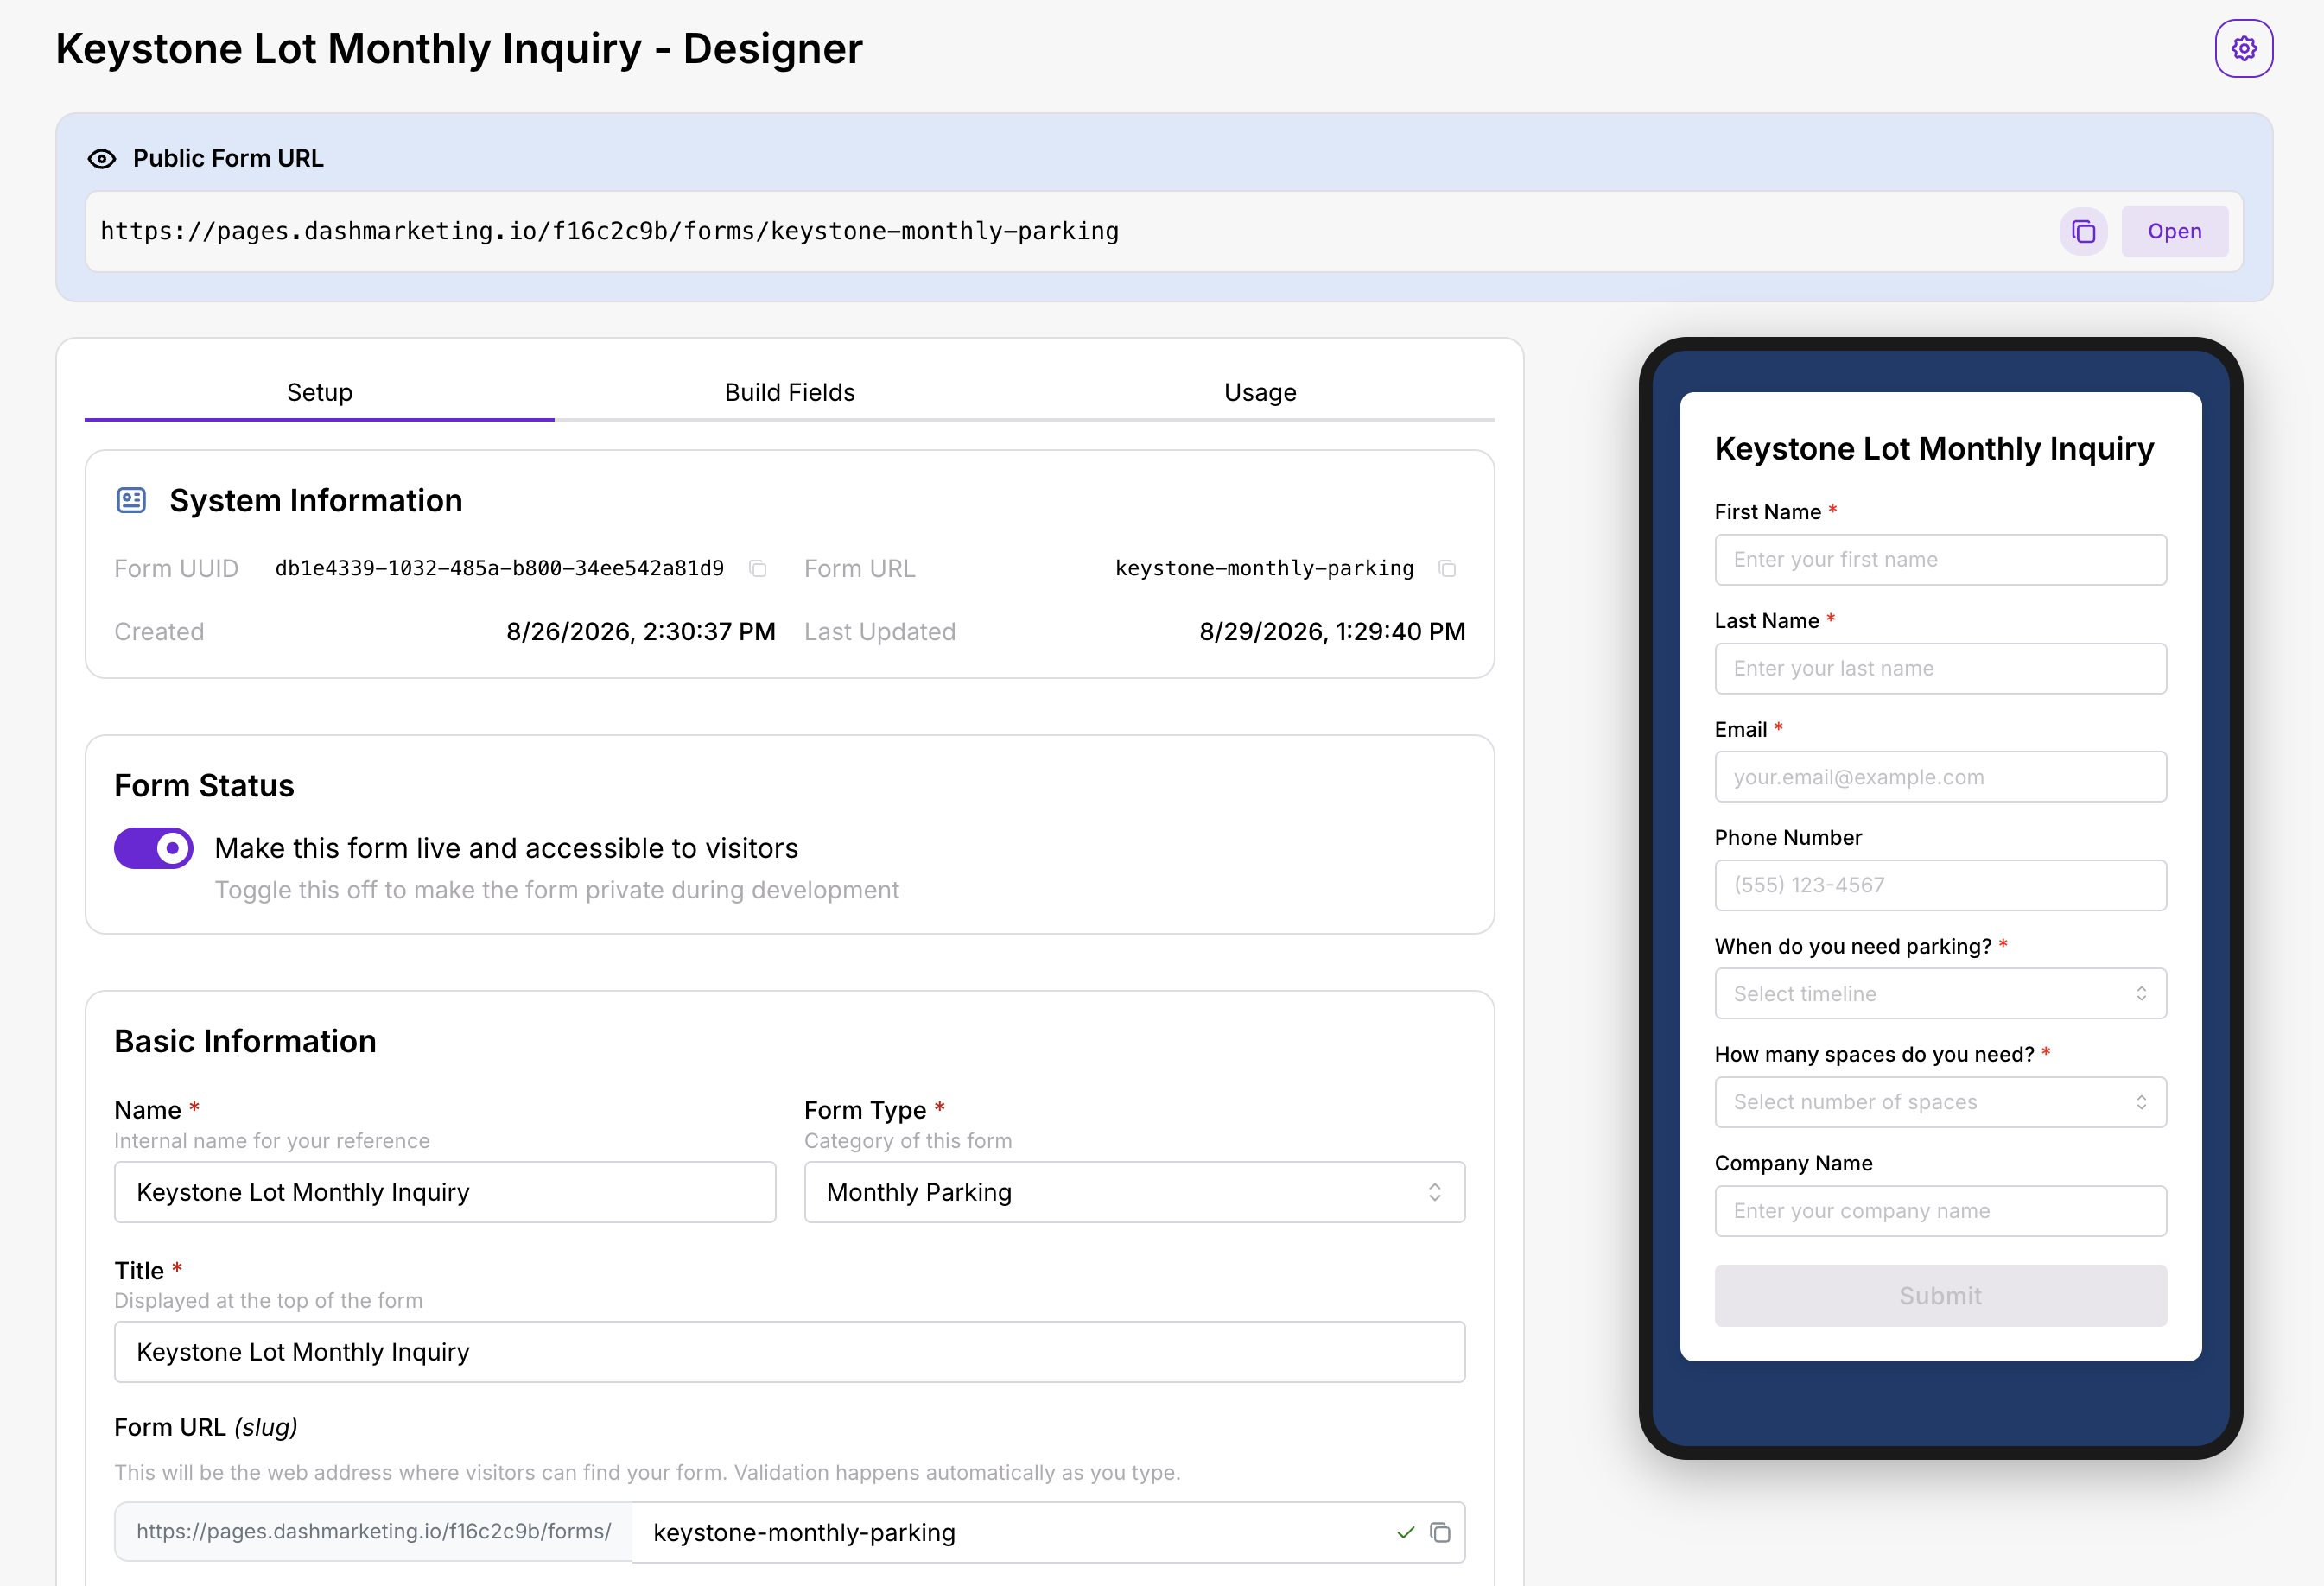 Step 1: System Information (read-only) shows the Form UUID, Form URL slug, and Created / Last Updated timestamps - useful for support requests and for API or trigger configuration.
Step 2: Form Status is a toggle for "Make this form live and accessible to visitors." Turn it off while you are building or retiring a form. An inactive form rejects submissions everywhere it appears, including inside Form widgets on live Dash Pages, so switch it off deliberately.
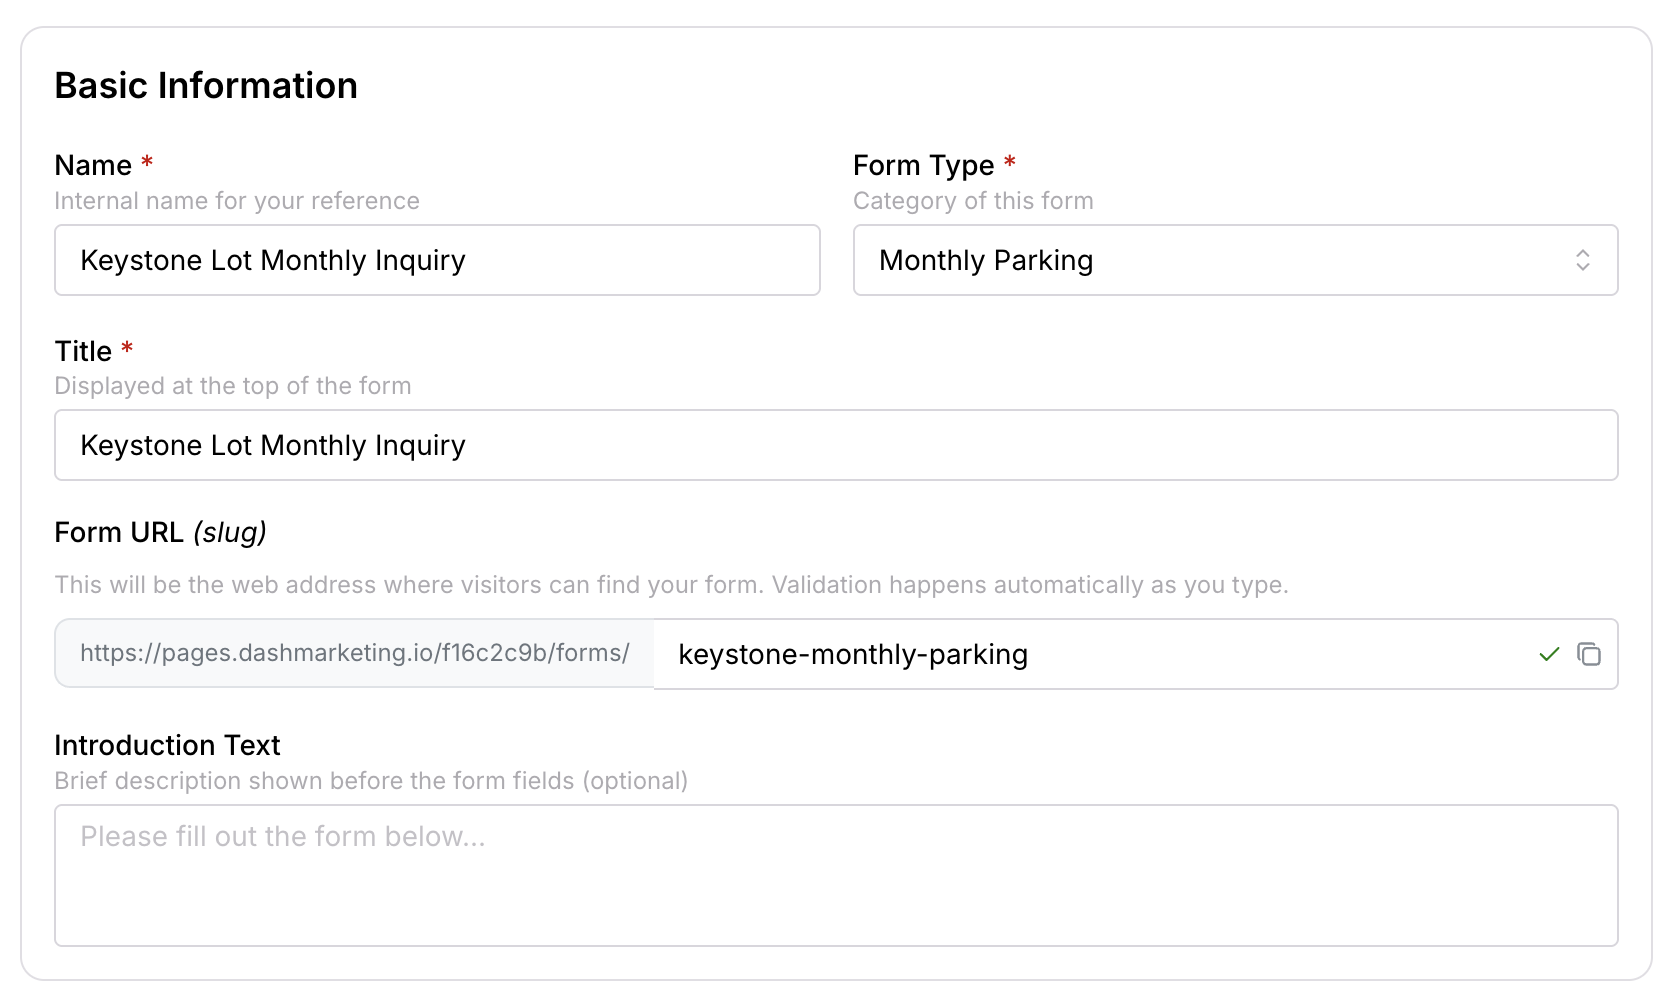
Step 3: Basic Information holds Name, Form Type, Title, Form URL and Introduction Text.
| Field | What it does | Guidance |
|---|---|---|
| Name | Internal name shown in the Forms table, in trigger form pickers and as "Form Name" on every lead. | Location plus purpose: "Keystone Lot Monthly Parking". |
| Form Type | Category of the form (see the table in Creating a New Form). | Changing the type after triggers exist shows a warning: triggers that target the old type stop firing for this form. Review those triggers before saving. |
| Title | Customer-facing heading at the top of the public form. | Plain language: "Request Monthly Parking". |
| Form URL | Slug for the standalone URL. Validated for uniqueness across the organisation as you type. | Changing it breaks any printed QR code or shared link, so treat it as fixed once published. |
| Introduction Text | Optional paragraph shown under the title, before the fields. | One or two sentences on what happens after they submit. |
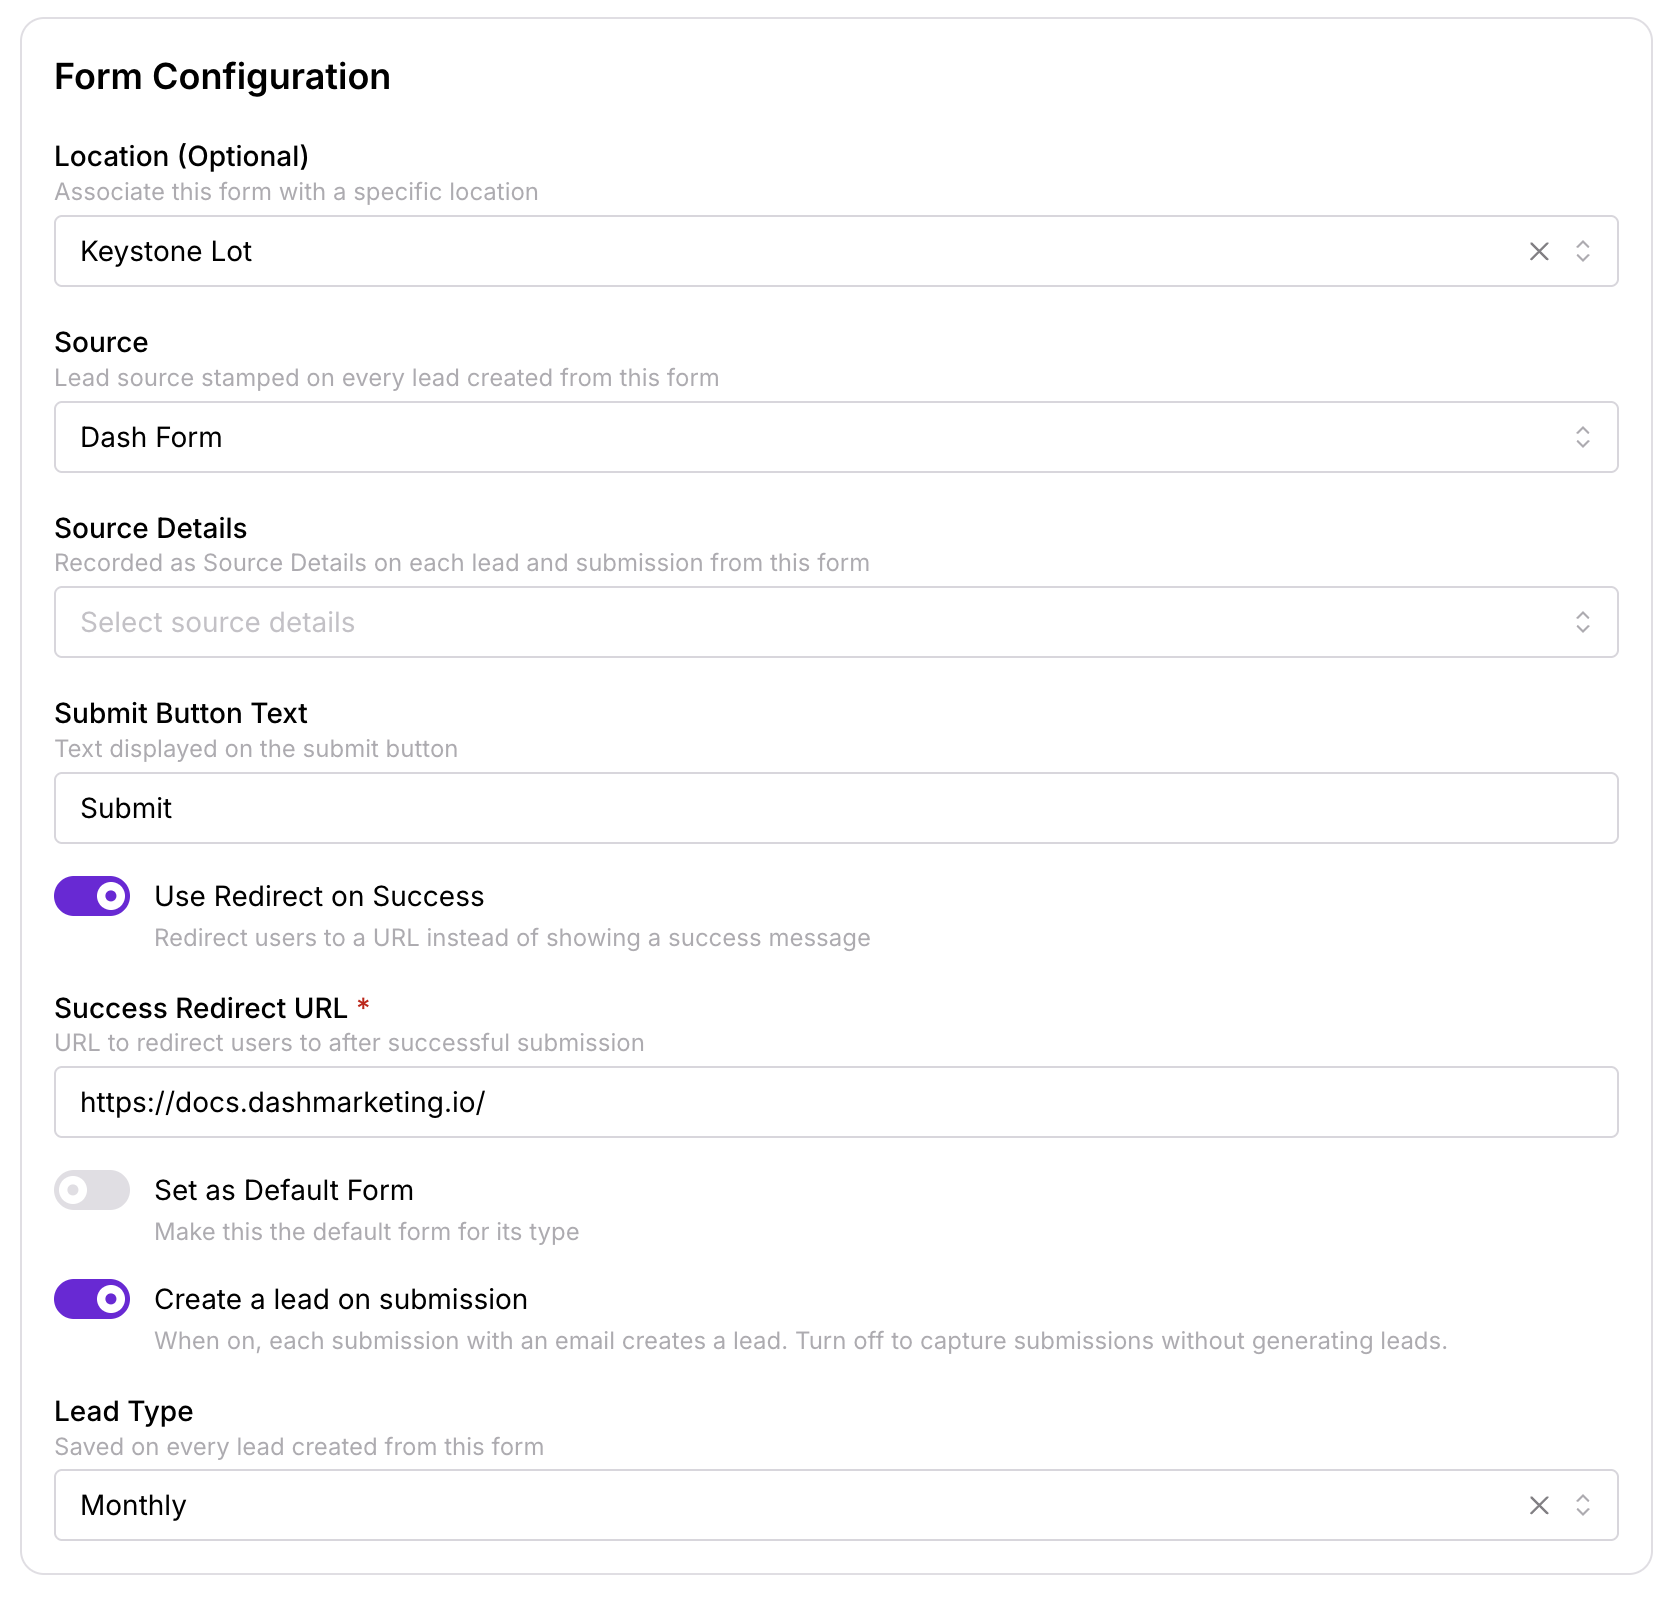
 Step 4: Form Configuration is where the form decides what a submission becomes. Save it with "Save Form Settings" at the bottom of the tab.
Location
Associates the form with a specific location. This is the single most important setting for reporting, because the form's location is authoritative: when it is set, every submission and every lead is pinned to that location, even if the form is embedded on a Dash Page for a different location.
When it is blank, the location is resolved from context instead - the Dash Page the form is embedded on. A submission on the standalone form URL with no form location has no location at all: it is linked to the organisation only, shows the "Unlinked location" badge, and Lead Created triggers will not fire for it (Form Submission triggers still do).
| Situation | Location setting |
|---|---|
| One form for one lot (monthly parking, validation, check-in) | Set the location. |
| One shared form embedded on many location pages | Leave blank so each page supplies its own. |
| Standalone URL with no location context (a QR code on a flyer) | Set the location, otherwise leads are unlinked and Lead Created triggers are skipped. |
Source
The lead source stamped on every lead created from this form. Defaults to Dash Form. The options are QR Code, Website, Referral, In-Person, Social Media, Advertisement, Dash Page, Dash Form, Inside Sales, Campaign, Promotional, Partner Page and Other.
Source drives the Leads dashboard (Leads Over Time by source, the Conversions donut) and the "Lead sources" audience filter on Lead Created triggers. Dash does not change it automatically based on where the form was submitted from, so pick it by how the visitor is expected to reach the form:
| How the visitor arrives | Source |
|---|---|
| Scans a QR code on signage, a flyer or a ticket | QR Code |
| Clicks through from a Dash Page (microsite) | Dash Page |
| Uses the standalone form URL from an email, SMS or website link | Dash Form (default) or Website |
| Arrives from a partner or property-management site | Partner Page |
| Arrives from an ad or paid campaign | Advertisement or Campaign |
| Staff fill it in on behalf of a walk-up | In-Person |
Because a form has exactly one Source, the same form cannot report two channels. If one enquiry form is used on both a QR code and a website, clone the form and set a different Source on each copy (cloning copies Source, Source Details and Lead Type). Changing Source only affects future leads; existing leads keep the value they were stamped with.
Source Details
A short free-text label recorded on both the submission and the lead, and shown as its own column in the Leads log. Use it as the sub-channel underneath Source. The dropdown offers Website, On site, Promotion and Partner page, plus Custom, which reveals a text box (up to 200 characters).
Examples that work well:
| Source | Source Details |
|---|---|
| QR Code | Lobby kiosk, Level 2 signage, Summer flyer |
| Dash Page | Keystone Lot Summer Promo |
| Website | On site (form on the customer's own site) |
| Partner Page | Partner page, or the partner's name |
Keep the vocabulary consistent across forms so the column filters cleanly. Leave it blank rather than inventing a value; it saves as empty. Like Source, it applies to future submissions only.
Submit Button Text
Text on the submit button. Defaults to "Submit". This exact text is also quoted in the consent line under the button ("By clicking "Submit", you agree to…"), so keep it short.
Use Redirect on Success
Off: after submitting, the visitor sees the Success Message (default "Thank you for your submission!"). On: the visitor is sent to the Success Redirect URL instead, which becomes required. Use redirect for flows that continue elsewhere, such as a monthly parking form that hands off to the Chargify or ParkingBase sign-up link. If you don't have that link yet, leave it off and add it later.
Set as Default Form
Marks this form as the default for its type and shows a "Default" badge in the Forms table. It is a label for your team to find the canonical form of each type; it does not currently change any automated behaviour.
Create a lead on submission
On by default. Each submission that includes an email address creates a Lead (status New) in the Leads dashboard, and Lead Created triggers fire for it (when a location is resolved, see above). The lead is only created if the form has an Email field type, not a text field labelled "Email", so always use the Email quick-add field.
Turn it off for forms where each submission is not a sales lead: Reputation Management feedback, Check-in, and internal Onboarding forms. Submissions are still stored and still fire Form Submission triggers; they just do not appear in Leads.
Lead Type
Shown only while "Create a lead on submission" is on. Saved on every lead created from this form, and used to separate demand for different products in lead reporting. The options are Monthly, Flex Daily and Other.
| Form Type | Lead Type |
|---|---|
| Monthly Parking | Monthly |
| Flex Daily | Flex Daily |
| Promotions, Advertisement, Contact Us | Other, or Monthly / Flex Daily if the promotion is for a specific product |
| Reputation Management, Check-in, Validation, Onboarding | Leave blank (these are usually not leads) |
Lead Type is an open text value on the lead itself, so leads arriving from Zapier or the Lead Submission API may carry other values; this dropdown only controls what Dash Forms stamps.
 Step 5: Terms And Privacy adds the consent line beneath the submit button. Toggle Terms and/or Privacy Policy on and enter the full URL (it must start with http:// or https://, up to 2048 characters, and is required once the toggle is on). The public form then reads "By clicking "Submit", you agree to our Terms of Service and Privacy Policy" with the links. Every submission stores a consent snapshot: the button text and which links were shown, with their URLs at the time. That snapshot is what you would produce if a customer disputes what they agreed to, so set these before the form goes live rather than after.
Step 6: Click "Save Form Settings" at the bottom of the tab to persist all changes on this tab. Fields on the Build Fields tab save independently.
Worked example - Keystone Lot Monthly Parking:
| Setting | Value |
|---|---|
| Form Type | Monthly Parking |
| Title | Request Monthly Parking at Keystone Lot |
| Location | Keystone Lot |
| Source | QR Code |
| Source Details | Lobby signage |
| Use Redirect on Success | Off (message: "Thanks! Our team will call you within one business day.") |
| Create a lead on submission | On |
| Lead Type | Monthly |
| Terms / Privacy | On, linked to Acme Parking's policy pages |
Was this page helpful?