
Triggers
Last updated August 28, 2026
Triggers
Triggers send an email automatically when something happens in your account. You pick the event, narrow who it applies to, attach a template, and switch it on. From then on it runs without anyone touching it.
Every trigger is built the same way, through a four-step wizard. Only step 1 changes depending on which event you chose.
In this section
Form Submission
Lead Created
First-Time Transaction
Transaction Milestone
New Subscription
Lead Converted
Where to find Triggers
Marketing → Triggers in the left sidebar.
📸 Screenshot 1 — The Triggers list Full-width capture of the Triggers page with several triggers in the table. Make sure the metric tiles, the date-range control and at least three rows are visible. Alt: The Triggers list page showing performance tiles and a table of configured triggers. File: triggers-01-list.png
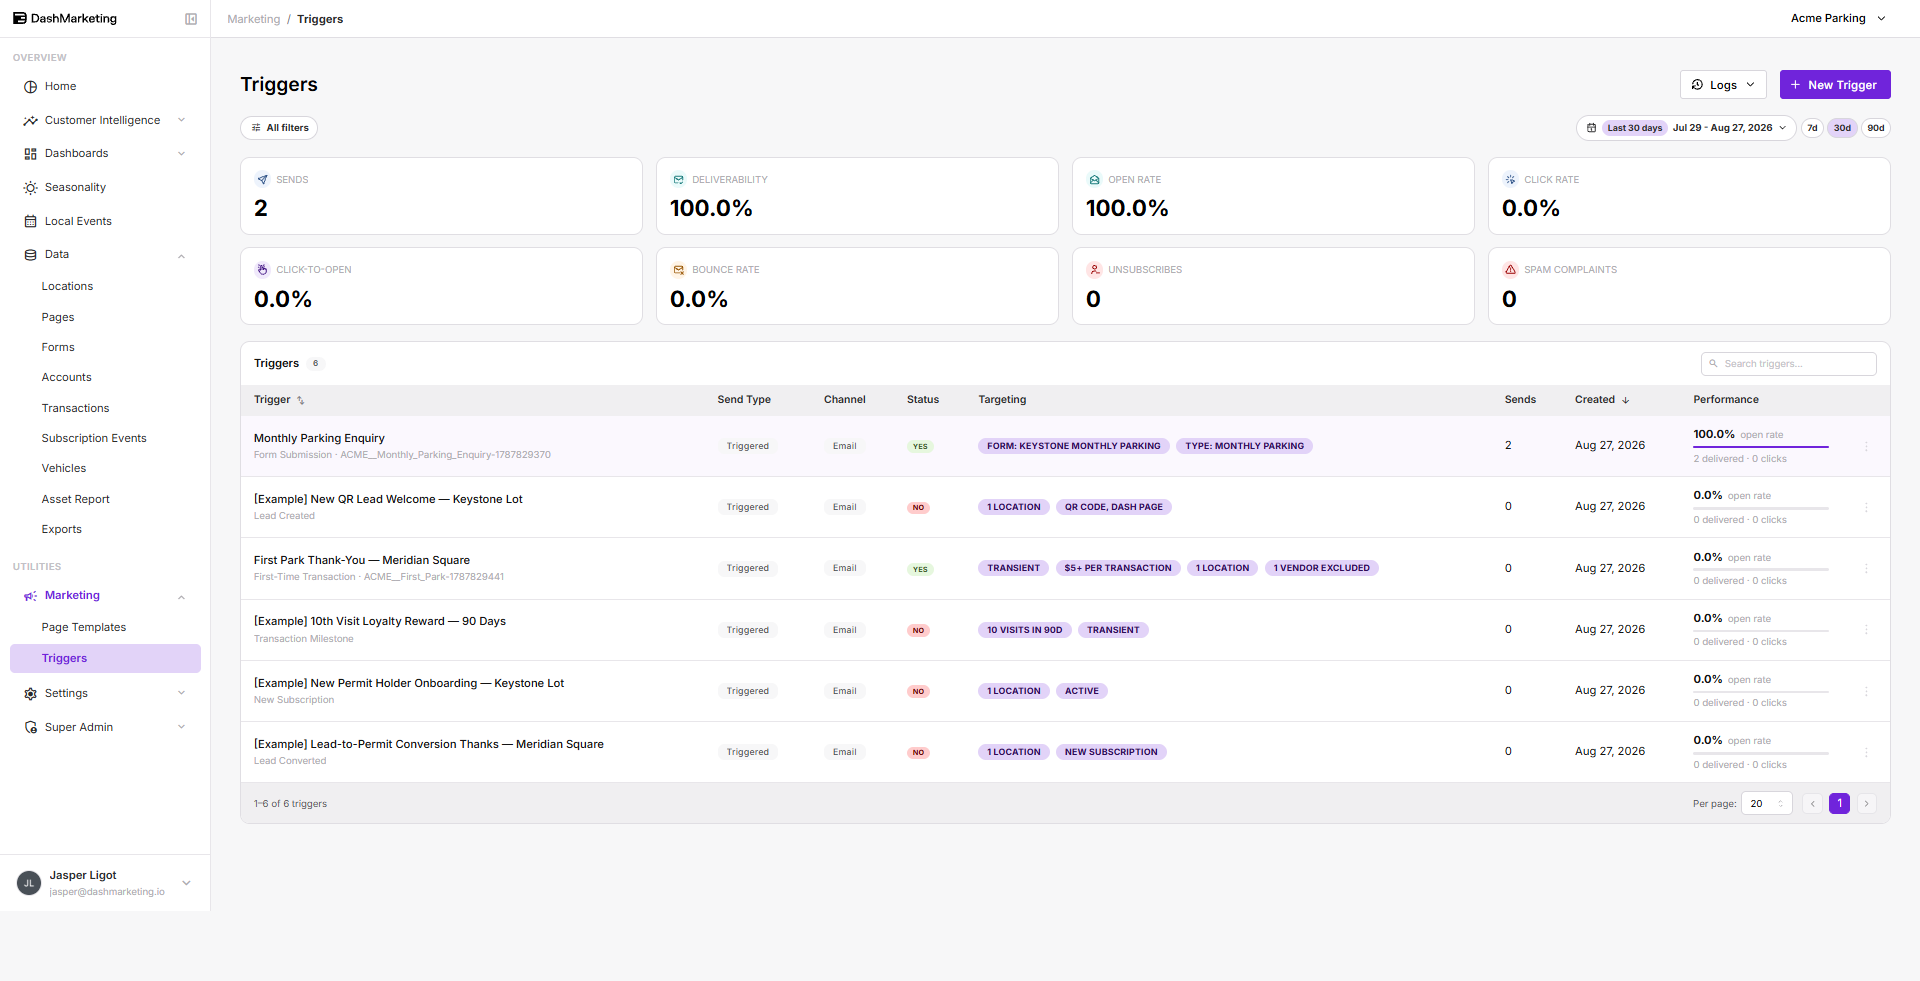 The list page has three parts.
Performance tiles across the top — Sends, Deliverability, Open Rate, Click Rate, Click-to-Open, Bounce Rate, Unsubscribes, Spam Complaints. These cover every trigger in the org for the selected period. Use the date-range picker or the 7d / 30d / 90d shortcuts to change the window. A dash means there is no data yet, not a zero.
The triggers table — one row per trigger:
| Column | What it shows |
|---|---|
| Trigger | The name you gave it, with the event type underneath |
| Send Type | How the email is dispatched (Triggered) |
| Channel | Email. A dash means no email action has been added yet |
| Status | Whether the trigger is live. NO means it is off and will not send |
| Targeting | A summary of the audience filters, as chips |
| Sends | Emails sent in the selected period |
| Created | Date the trigger was first saved |
| Performance | Open rate, with delivered and click counts underneath |
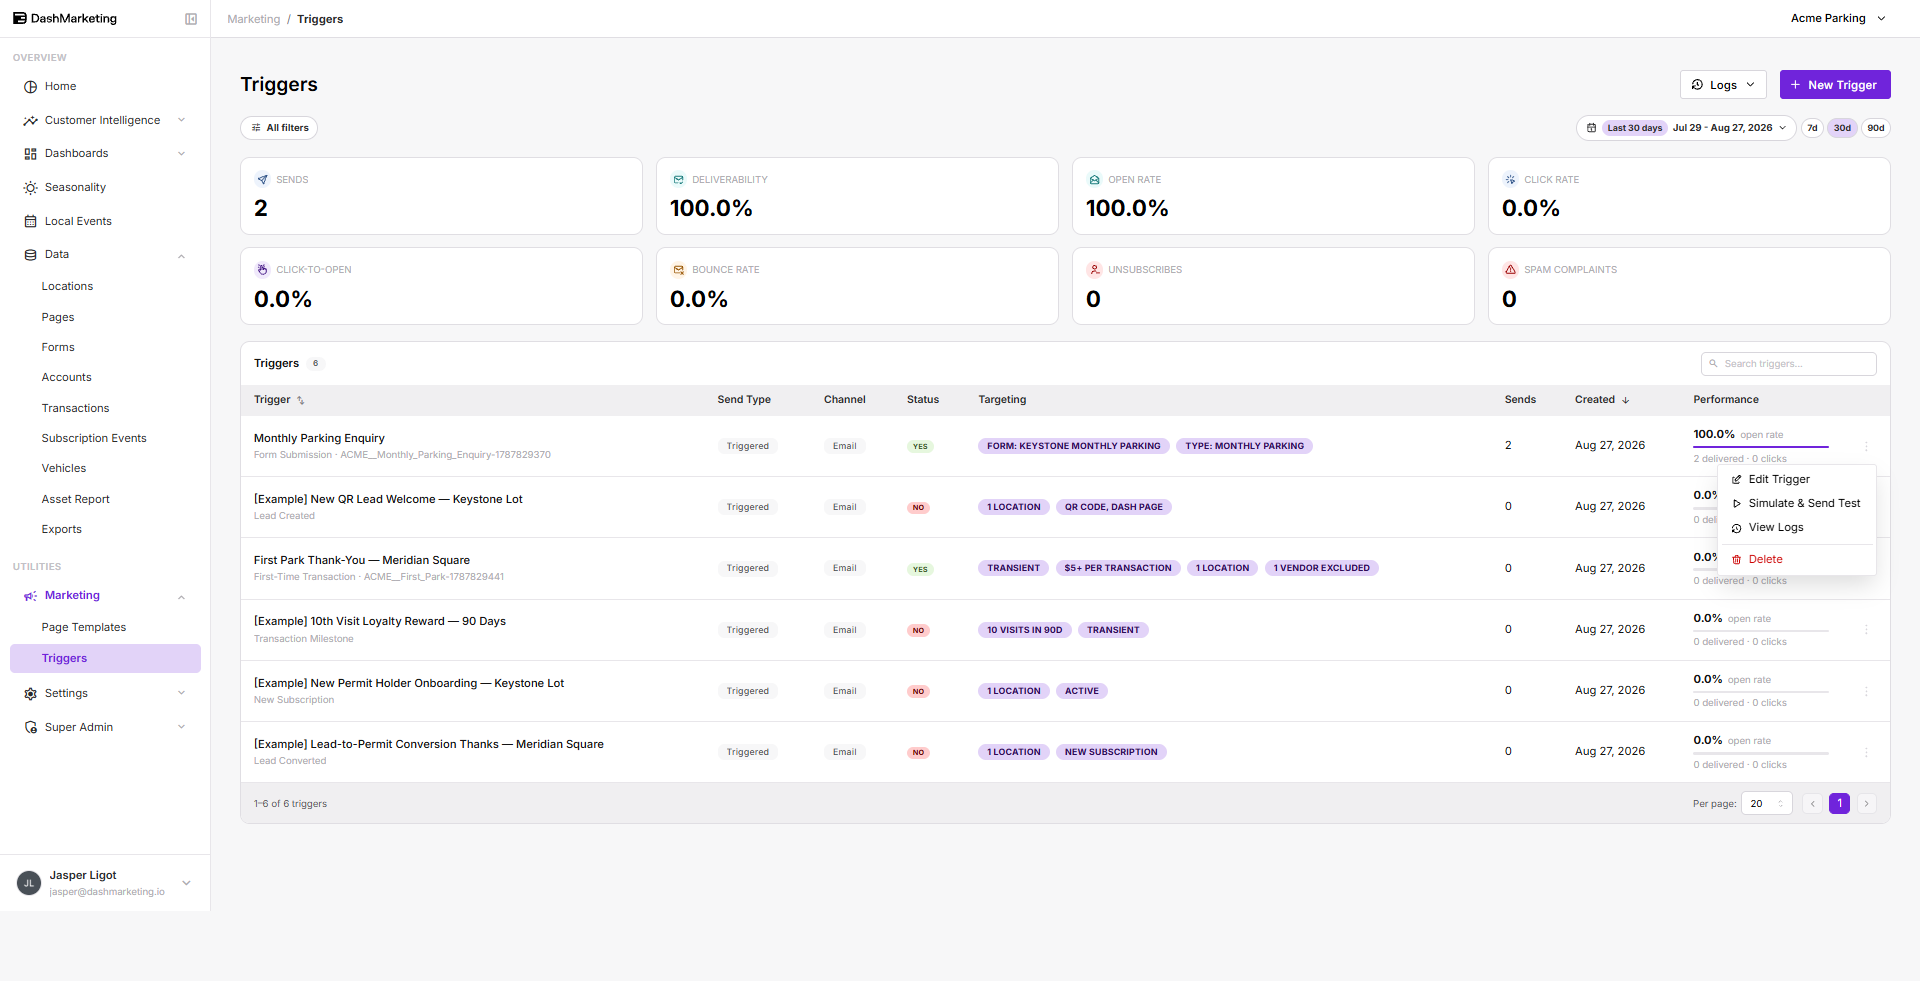
Row actions — the ⋮ menu at the end of each row:
Edit Trigger — reopens the wizard
Simulate & Send Test — stages a fake event and sends the resulting email to addresses you nominate
View Logs — every send attempt for that trigger
Delete — permanent
📸 Screenshot 2 — Row actions menu Open the ⋮ menu on any row. Crop tight to the row and the open menu. Alt: The row actions menu showing Edit Trigger, Simulate & Send Test, View Logs and Delete. File: triggers-02-row-menu.png
Logs in the page header opens View All Email Logs — every send from every trigger, in one place.
 ---
---
The four steps
| Step | What you do |
|---|---|
| 1. Audience | Choose the event, then narrow which records qualify |
| 2. Define | Name the trigger and set its delivery rules |
| 3. Template | Pick the email template and set recipients |
| 4. Review | Check everything and activate |
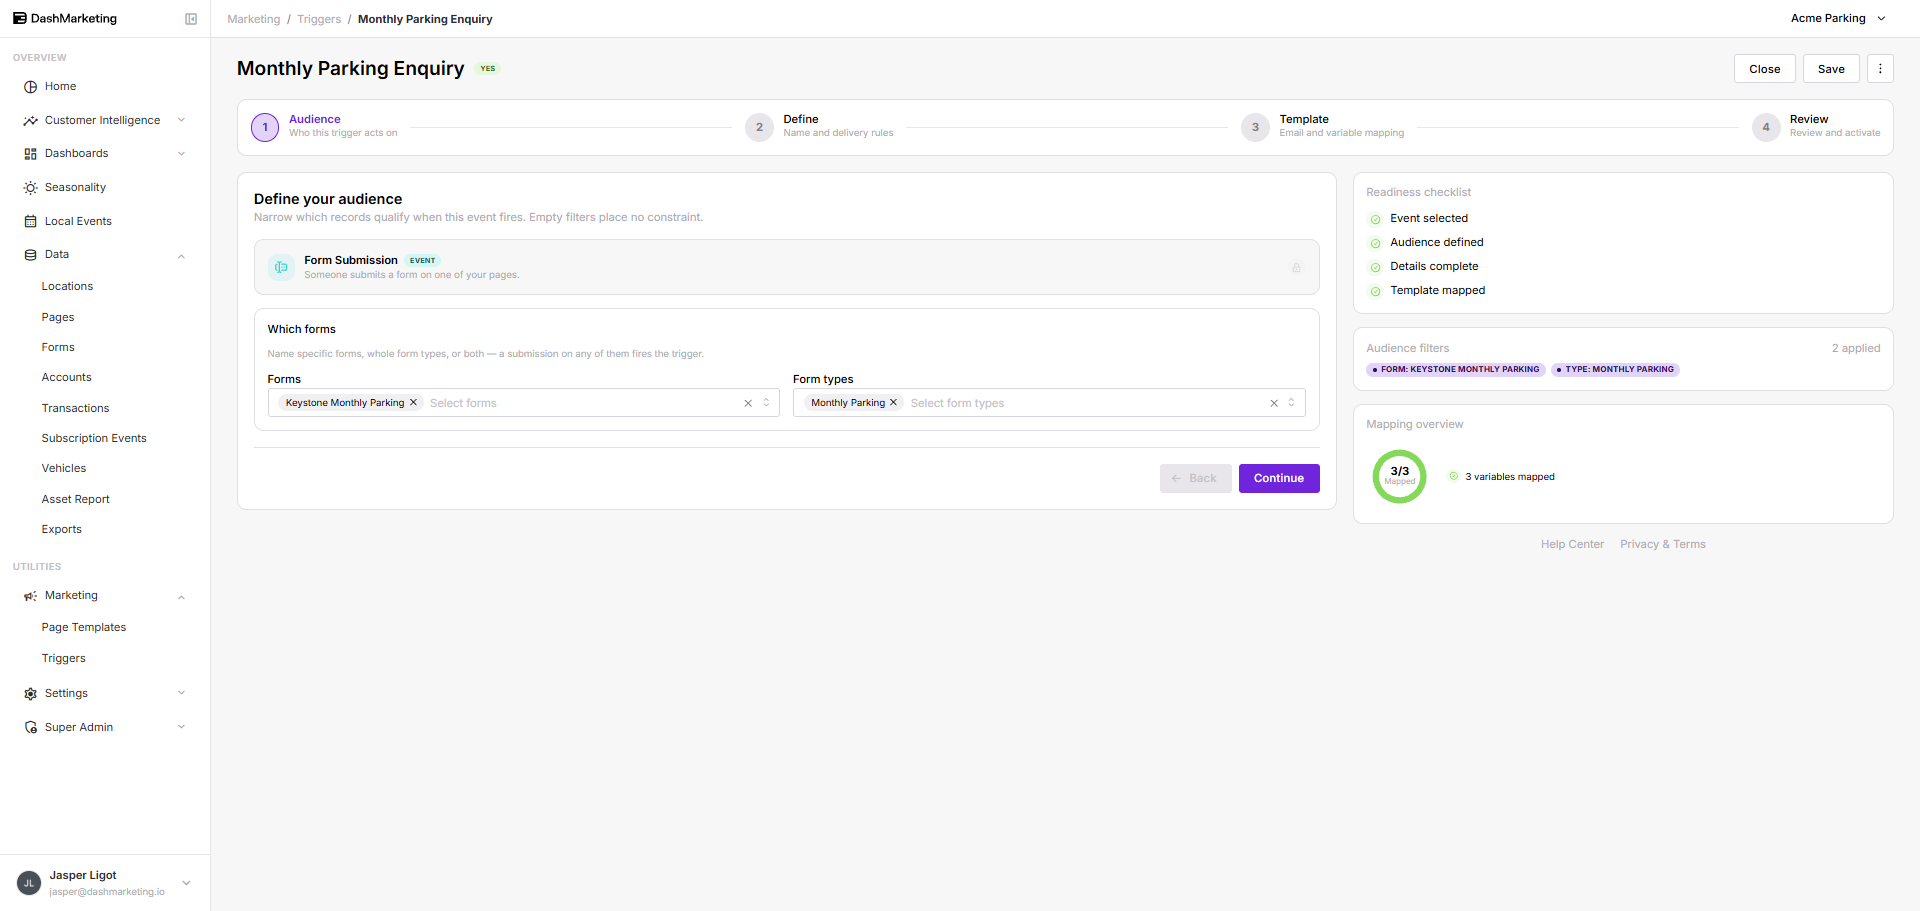
The Readiness checklist on the right tracks your progress: Event selected, Audience defined, Details complete, Template mapped. All four must be green before a trigger can go live.
Underneath it, the Audience filters panel shows a running summary of what you have narrowed to, as chips, with a count. It is the fastest way to check you have not accidentally filtered your audience down to nobody.
📸 Screenshot 3 — The wizard with the right rail Any trigger open on step 1 with two or three filters applied, so both the Readiness checklist and the Audience filters chips are populated. Alt: The trigger wizard on the Audience step, with the readiness checklist and audience filter chips visible on the right. File: triggers-03-wizard-rail.png
 ---
---
Step 1 — Audience
Click + New Trigger. You are asked What should fire this trigger? and shown six event cards.
📸 Screenshot 4 — The event picker The full "What should fire this trigger?" screen with all six cards visible. Alt: The event picker showing Form Submission, Lead Created, First-Time Transaction, Transaction Milestone, New Subscription and Lead Converted. File: triggers-04-event-picker.png
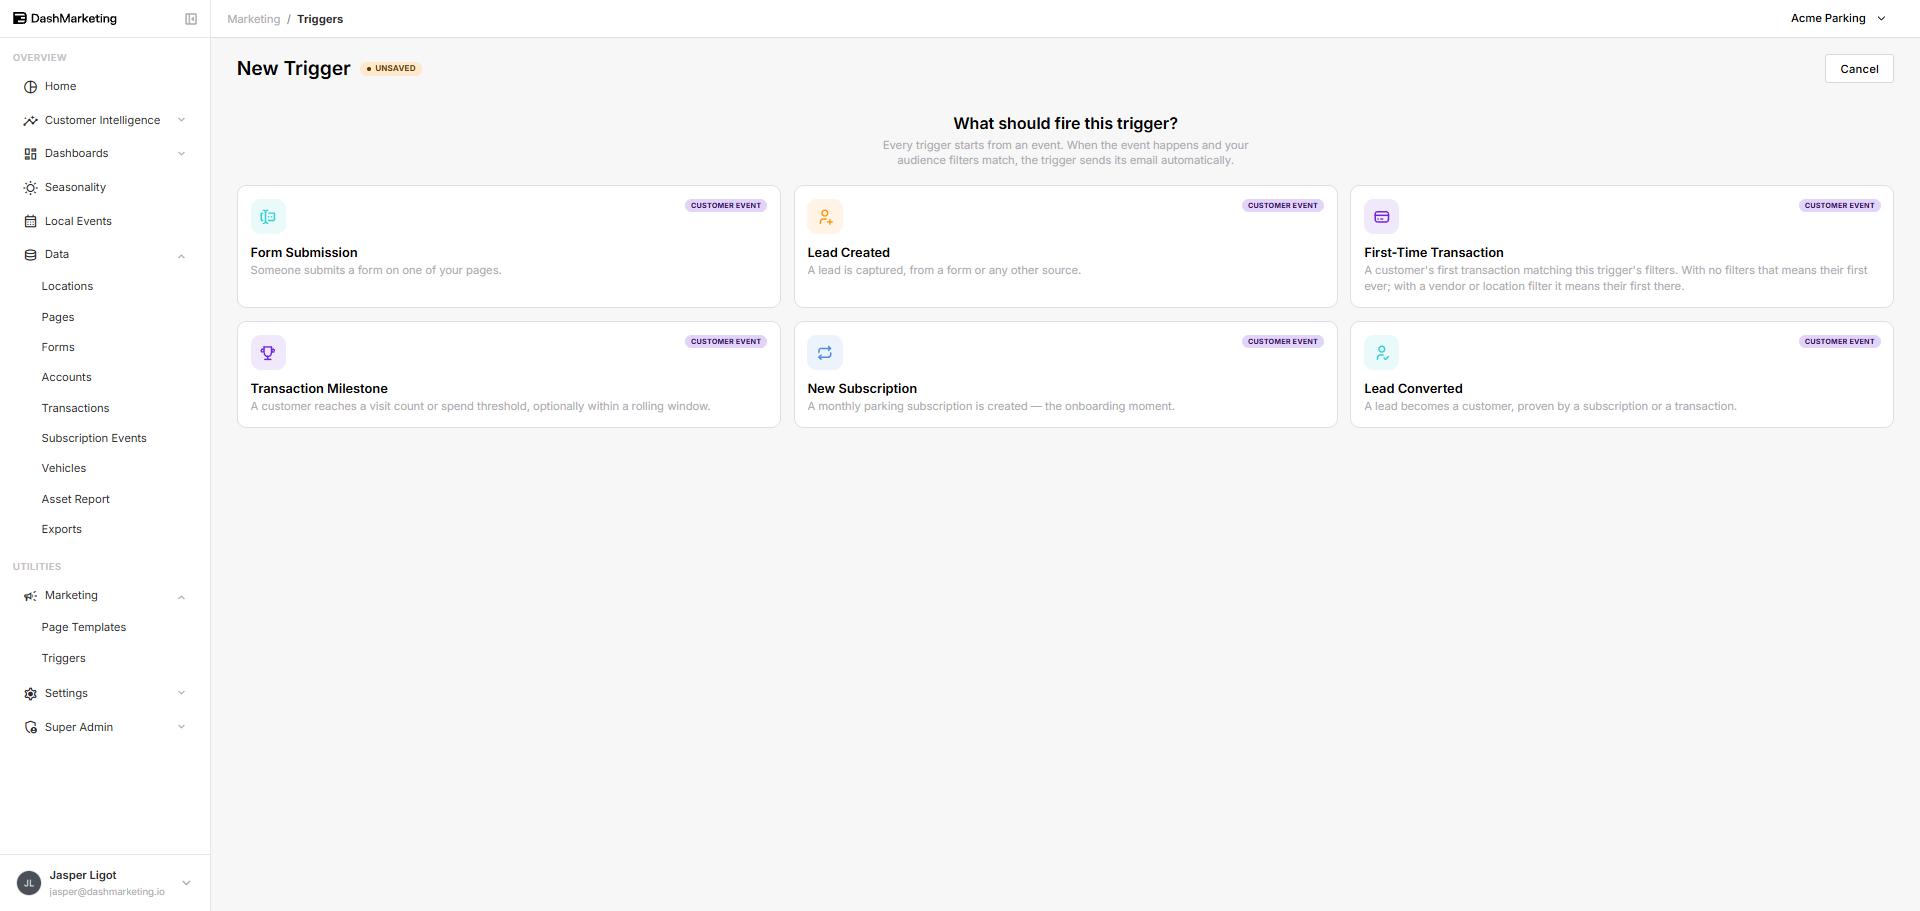 | Event | Fires when | | --- | --- | | Form Submission | Someone submits a form on one of your pages | | Lead Created | A lead is captured, from a form or any other source | | First-Time Transaction | A customer's first transaction matching this trigger's filters | | Transaction Milestone | A customer reaches a visit count or spend threshold | | New Subscription | A monthly parking subscription is created | | Lead Converted | A lead becomes a customer, proven by a subscription or a transaction |
Pick one and you land on Define your audience, where the filters shown are specific to that event. Each event has its own guide — see the list at the top of this page.
Two things worth knowing before you start filtering:
Empty means everything. With one exception, leaving a filter blank places no constraint on it. An empty Locations field means all locations, not none. The exception is Form Submission, which requires at least one form or form type before it will let you continue.
The filter dropdowns are type-to-search. Clicking an empty filter field will not open a list. Start typing, or press the down arrow, and the options appear. Once a value is selected, clicking the field opens the full list normally.
You can change your mind at any point with Change event at the top of the audience card, but doing so clears the filters you have already set.
Step 2 — Define
Trigger Name is the only required field. It is what your team sees in the triggers list, so make it specific — "Monthly Parking Enquiry Auto-Reply" rather than "Email 3".
📸 Screenshot 5 — The Define step with Advanced Options open Expand Advanced Options so Priority and Stop after this trigger are both visible. Alt: The Define step showing the Trigger Name field with Advanced Options expanded. File: triggers-05-define.png
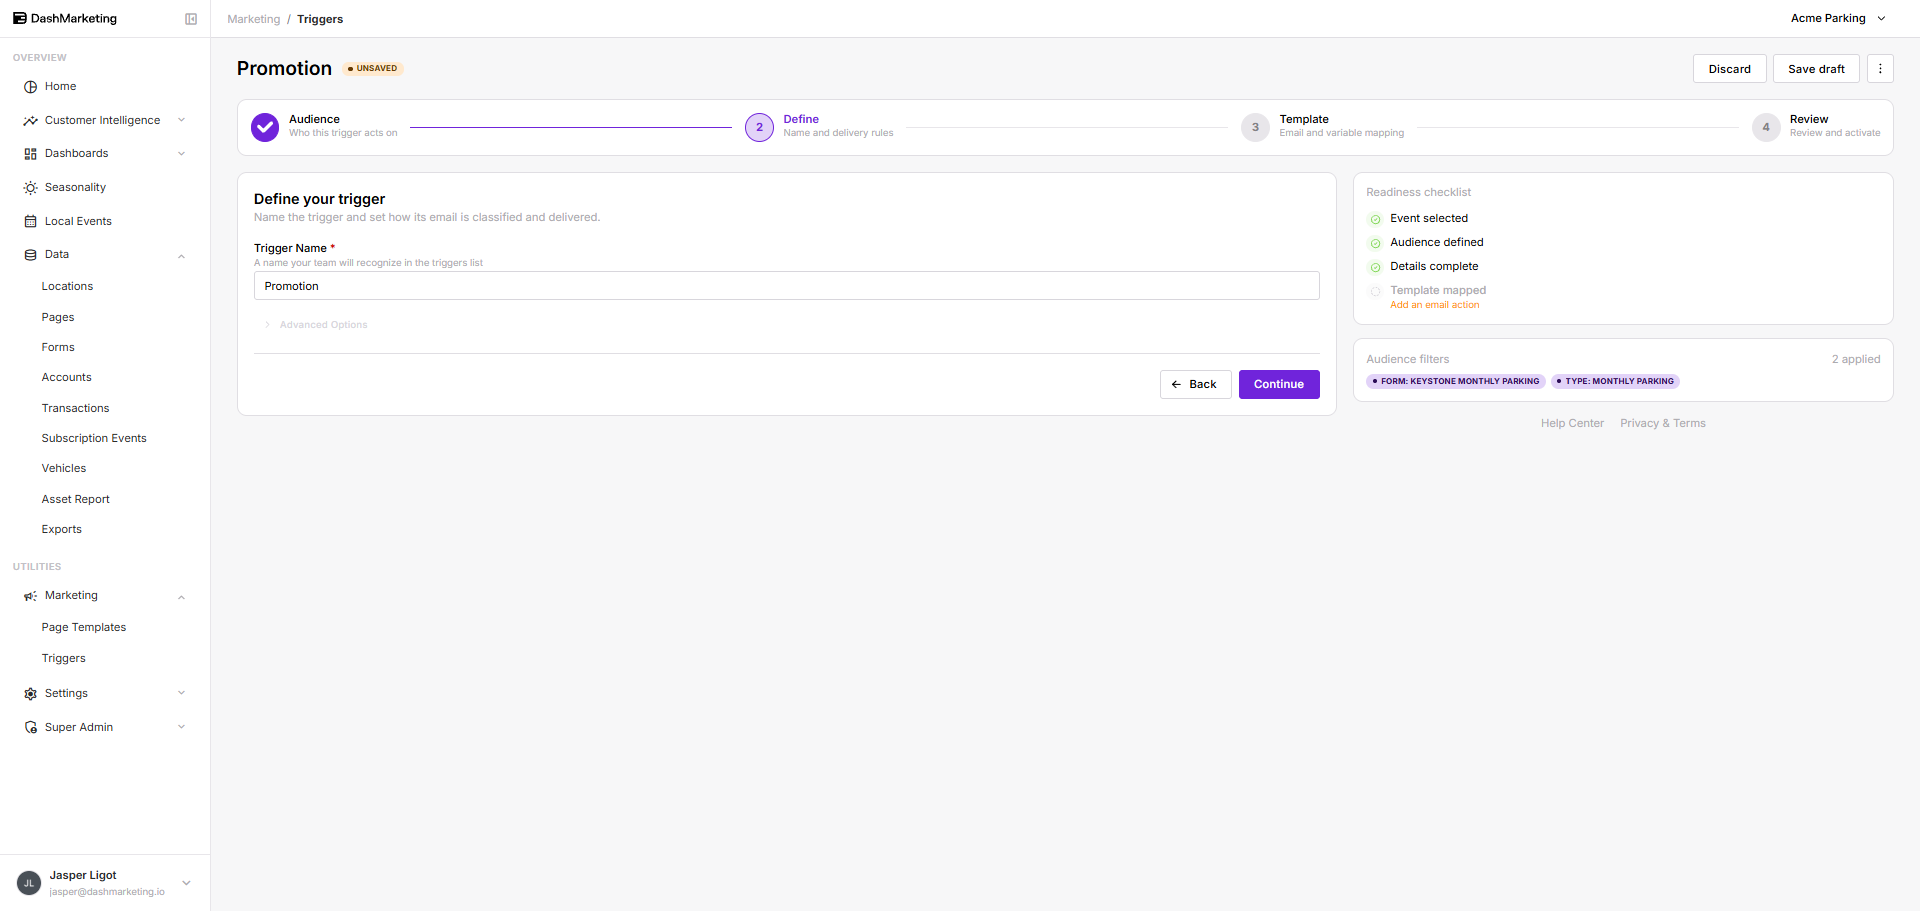 Advanced Options controls what happens when more than one trigger matches the same event. The portal's own summary: "When multiple triggers match the same event, they run in priority order. Use these settings to control execution order and prevent duplicate emails."
Priority — a number, default 0. "Triggers run from lowest to highest." Ties are broken by creation order.
The number is an execution position, not an importance score. Priority 0 runs first. The trigger you most want to win should have the lowest number, not the highest — which is the opposite of how "priority 1" reads in most other software.
Stop after this trigger — off by default. "When this trigger fires successfully, skip all remaining lower-priority triggers for this event." In practice: skip everything with a higher number that has not run yet. This is how you prevent a customer receiving three emails from one transaction.
A worked example. You have a general "thanks for parking" email and a location-specific "welcome to Meridian Square" email, and no customer should get both. Set the Meridian one to priority 0 with Stop after this trigger on, and the general one to priority 10. Meridian customers get the specific email and the chain stops there; everyone else falls through to the general one.
Step 3 — Template
Channel. Email is the only channel available. SMS via Twilio is marked Coming Soon and cannot be selected.
Select template opens the template picker — a searchable list of the email templates assigned to your organization, with each template's ID, source and detected variables. Choosing one detects its variables so you can map each to a data source.
📸 Screenshot 6 — The template picker The Template selection modal with templates listed, showing the Template Name / Template ID / Source / Variables columns. Alt: The template selection dialog listing available email templates and their variables. File: triggers-06-template-picker.png
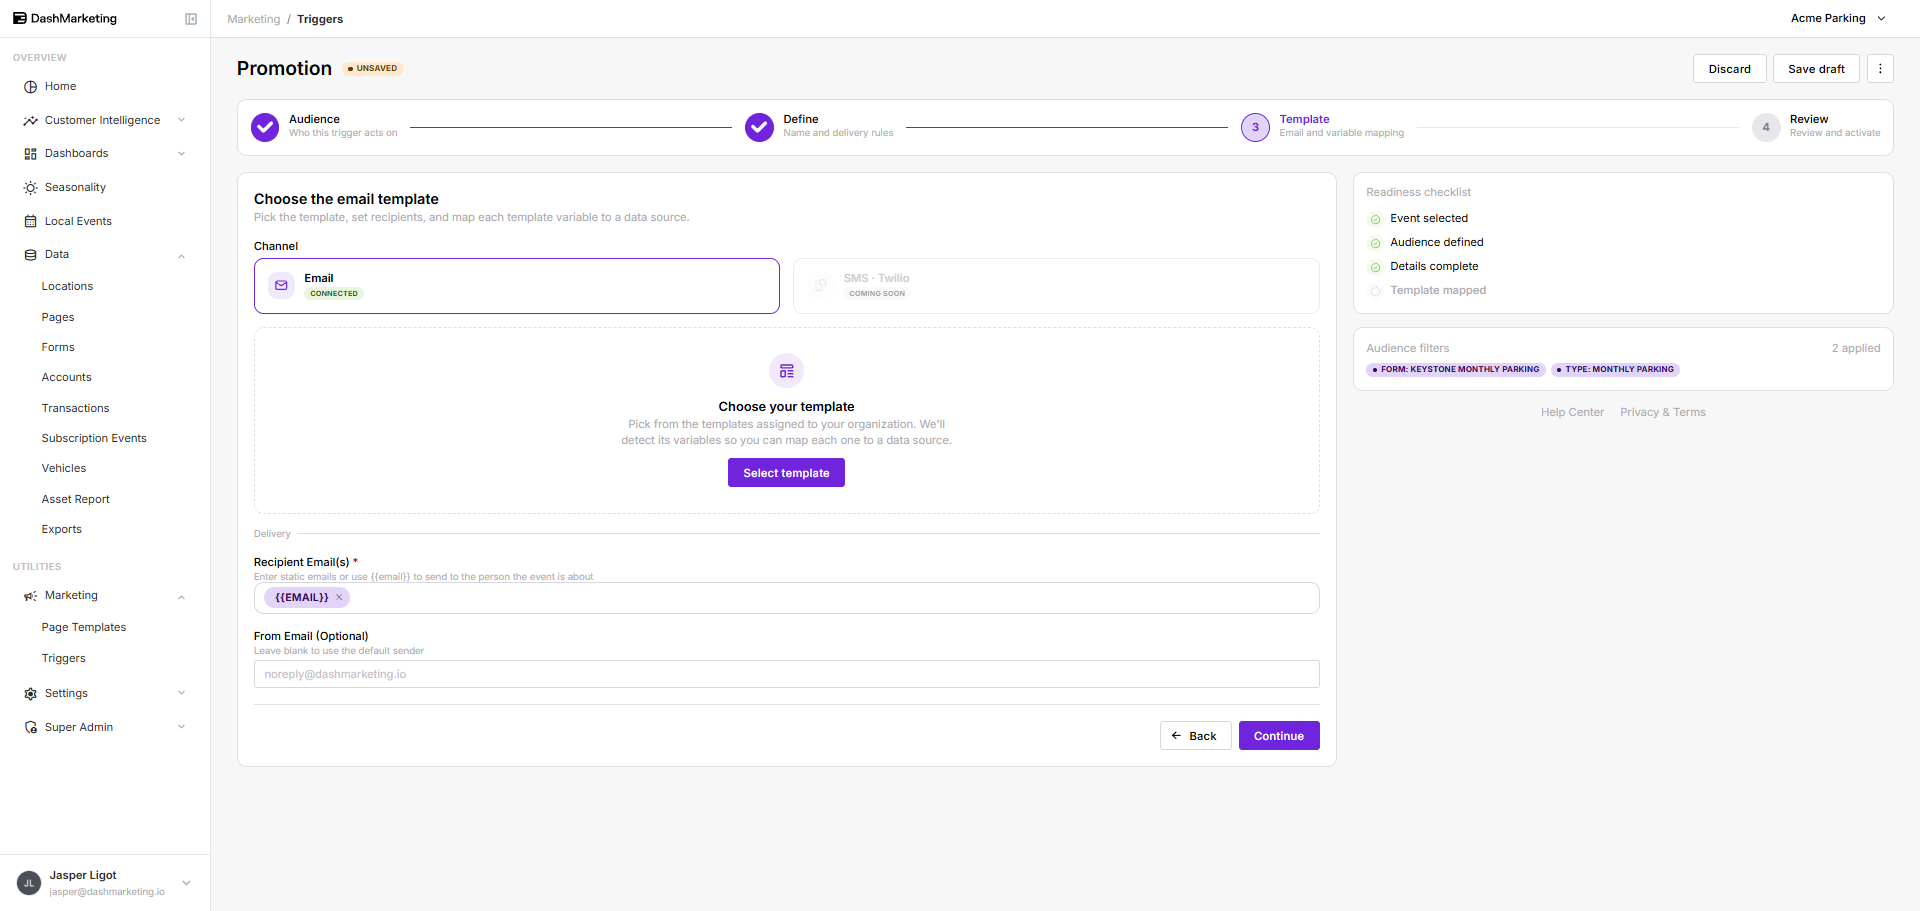 A template is mandatory. You cannot advance to step 4 without one. If the picker says "No email templates are assigned to this organization", contact Dash support to have templates assigned — there is no way to add them from inside the portal.
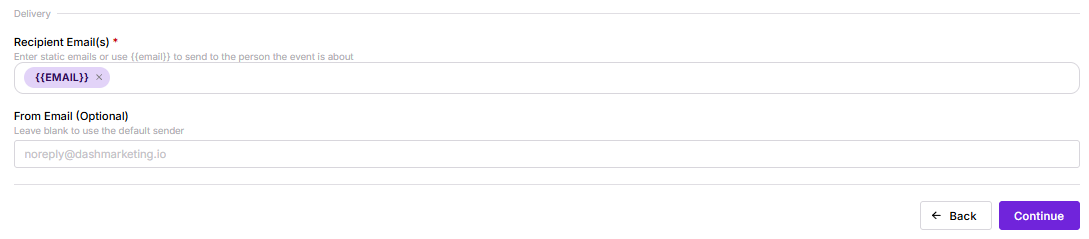
Delivery.
Recipient Email(s) — required, and pre-filled with {{EMAIL}}, which resolves to the person the event is about. Replace or add to it with static addresses if the email should go to your team instead of the customer — for example, routing new enquiries to a sales inbox.
From Email — optional. Leave blank to use the default sender (noreply@dashmarketing.io).
📸 Screenshot 7 — The Delivery section Crop to the Delivery block showing the {{EMAIL}} chip in Recipient Email(s) and the From Email field. Alt: The Delivery section with the EMAIL variable set as the recipient. File: triggers-07-delivery.png
 ---
---
Step 4 — Review
⚠️ This section is not yet written. Step 4 cannot be reached without an email template attached, and no templates were available in the account these guides were written against. Once a template is assigned, this section needs to be completed with the Review screen and the activation control.
Saving and activating
Save draft saves your work at any point, from any step, even with the wizard incomplete. A saved draft appears in the triggers list with Status NO — it exists, but it will never send. This is the safe way to build something and come back to it.
A trigger only sends once it has been activated on step 4. Until then, nothing reaches a customer.
One thing to watch: if you save a draft without ever opening step 3, the trigger saves with no email action and its Channel column shows a dash. It is still a valid draft, it just has nothing to send yet.
Testing before you go live
Use Simulate & Send Test from the row menu. It stages a fake event of the right type, runs it through your trigger, and sends the resulting email — but only to the addresses you list under Test recipients. Real customers are never contacted, no matter what the trigger's recipient settings say.
📸 Screenshot 8 — Simulate & Send Test The simulation panel showing the staging fields, the Test recipients box, and the Run simulation & send test email button. Alt: The Simulate and Send Test panel with test recipients configured. File: triggers-08-simulate.png
Test before activating, every time. It is the only way to see what the merged email actually looks like with real data in it.
Was this page helpful?