
Setting Up a Campaign
Last updated September 29, 2026
This guide walks through building a campaign from Create campaign to Submit campaign for approval. The builder has five steps:
| Step | What you do |
|---|---|
| 1. Setup | Pick the channel, who you're targeting (parkers or leads), and which locations the campaign is for |
| 2. Audience | Filter down to the people who should receive it, or reuse a saved audience |
| 3. Content | Choose an email template and fill in each of its variables |
| 4. Define | Name the campaign, set the message type, conversion tracking, sender and send date |
| 5. Review | Check everything and submit it to the Dash team |
Under the steps are Back and Continue buttons. You can jump back to any step you've already completed, but not ahead past one that isn't finished. If a change makes an earlier step invalid, that step turns red.
Saving your work
Save draft (top right) saves at any point, including partway through a step. Drafts appear in the campaign list with the status Draft and never send.
The builder also saves automatically the first time you reach the Content step. This is needed because template variable mappings are stored against a saved campaign. If you haven't named the campaign yet, it's saved as Untitled draft. Until that first save, the title shows an Unsaved badge.
Discard throws away unsaved changes and returns you to the list.
The Estimated Audience panel
On every step except Review, the right-hand panel shows who the campaign will reach, updating as you change the setup:
- Estimated Audience: how many people match, out of your total and as a percentage, plus Average Parker Value, Average Transactions and Revenue Represented.
- A one-sentence summary of your filters, such as "All parkers."
- Estimated recipients by vendor: the audience split by the parking vendor each person came from. For each vendor you can:
- click the eye icon to preview the email those recipients will get
- click the ban icon (Do not send to {vendor} recipients) to leave that vendor's customers out
- Choose who they route to: for Dash-sourced people (captured directly by Dash, for example through a Dash Form), pick which vendor's booking link and values they should get.
Check this panel often. It's the quickest way to spot an audience that's too narrow, or a vendor cohort that won't receive anything. Who Receives Your Campaign explains why some people are counted but don't receive it.
Step 1: Setup
Channel and locations
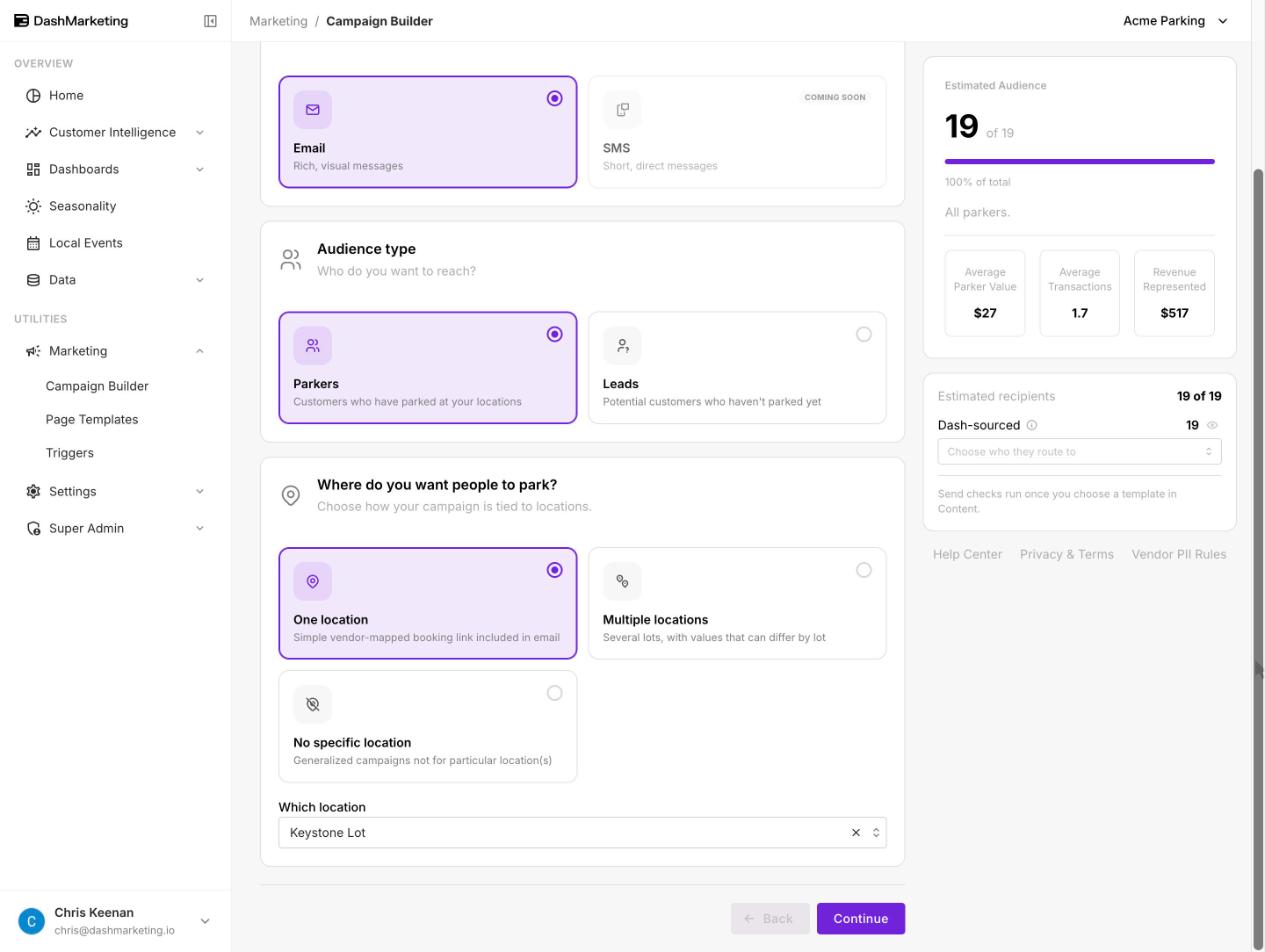
Channel
Email is always selected. SMS is shown as Coming soon and can't be selected yet.
Audience type
| Option | Who it targets |
|---|---|
| Parkers (default) | Customers who have parked at your locations |
| Leads | Potential customers who haven't parked yet |
A saved audience that combines both can also be used. Its type is set automatically when you pick it on the Audience step.
Where do you want people to park?
This decides which locations the campaign is attributed to, and whether the email can include a booking link.
| Option | Use it when | Booking link |
|---|---|---|
| One location | The campaign promotes a single lot. Choose it under Which location. | ✅ Each recipient gets that location's booking link for their vendor |
| Multiple locations | The campaign covers several lots. Choose at least two under Which locations. | ❌ The template must not contain a booking link |
| No specific location (default) | A general message that isn't about particular lots (a newsletter, a brand announcement) | ❌ The template must not contain a booking link |
With multiple locations, the lots you pick still count towards the campaign's performance.
Step 2: Audience
Filter customers
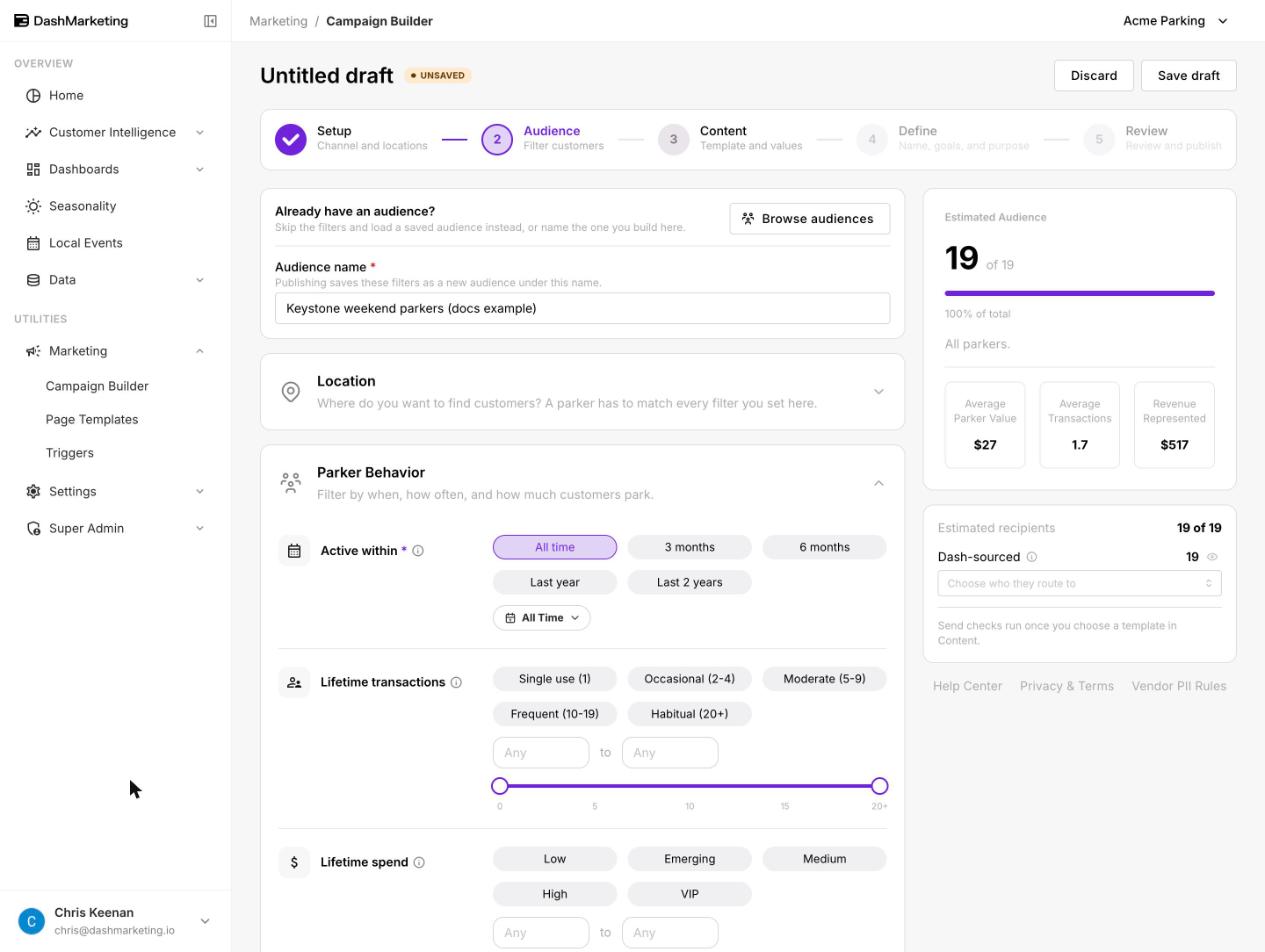
Use a saved audience, or build a new one
The Already have an audience? card at the top has a Browse audiences button. It opens Use a saved audience, which lists saved audiences from Campaign Builder and Audience Builder with their client, size, and how many campaigns already use them.
- Pick one and the filters lock to that audience ("Filters are locked to this audience. Edit as new to change them."). Change audience swaps it for another.
- Edit as new copies the audience as "{name} (Copy)" so you can change its filters without touching the original. Use the original instead undoes this.
- Start from scratch builds a new audience from the filters below.
When you build a new audience, Audience name is required. Submitting the campaign saves your filters as a new saved audience under this name, so it must be unique.
Location filters
Expand the Location section to narrow the audience to people linked to particular places or products: Client, City, Location(s), Parking Region, Operation Type, Asset Type, Vendors and Parking Product. A parker has to match every filter you set. As everywhere else in Dash, an empty filter means everything.
Parker behavior (Parkers audiences)
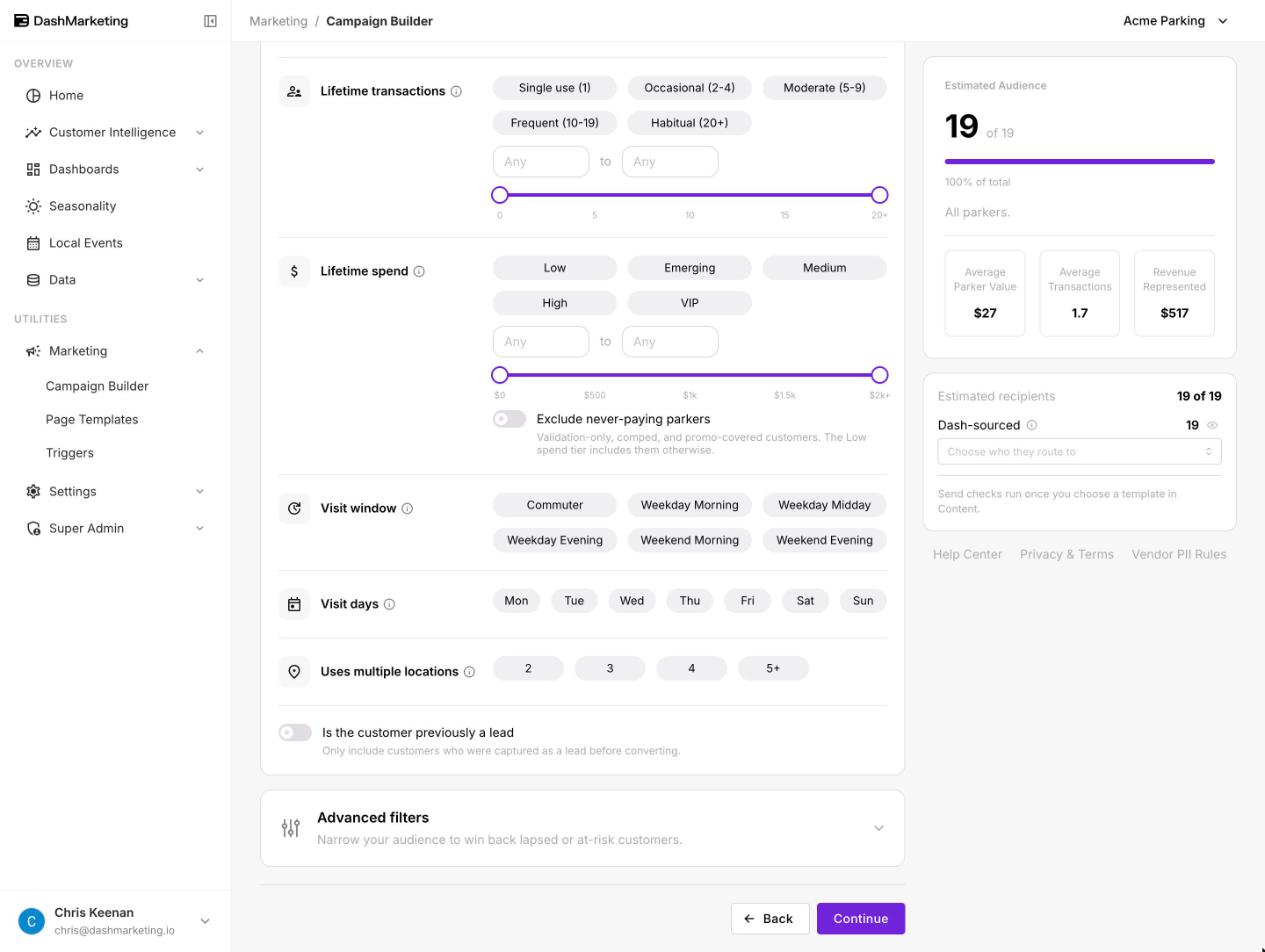
| Filter | What it does |
|---|---|
| Active within | Required. How recently they must have parked: All time (default), 3 months, 6 months, Last year, Last 2 years, or a custom date range. |
| Lifetime transactions | How many times they've parked: Single use (1), Occasional (2–4), Moderate (5–9), Frequent (10–19) or Habitual (20+), or a custom range with the slider |
| Lifetime spend | How much they've spent in total: Low, Emerging, Medium, High or VIP, or a custom range. Exclude never-paying parkers removes validation-only, comped and promo-covered customers, who otherwise fall into the Low tier. |
| Visit window | When they usually park: Commuter, Weekday Morning, Weekday Midday, Weekday Evening, Weekend Morning or Weekend Evening |
| Visit days | The days of the week they usually park |
| Uses multiple locations | People who have parked at 2, 3, 4 or 5+ of your locations |
| Is the customer previously a lead | Only parkers who were captured as a lead before converting |
Advanced filters (collapsed by default, for winning back lapsed or at-risk customers):
| Filter | What it does |
|---|---|
| Dormant for at least | Hasn't parked for at least this many days. Useful for reactivation campaigns. |
| Visit pattern | Predictable, Semi-regular or Irregular |
| Return status | On pace, Late (overdue compared with their usual pattern), or Long absent |
| Email domain | Only addresses at particular domains, such as a corporate domain for an employer promotion |
Lead criteria (Leads audiences)
| Filter | What it does |
|---|---|
| Acquired | When the lead came in: All time, 6 months, 3 months, 30 days, 7 days, or a custom month range |
| Status | Lead status |
| Source | Lead source (QR Code, Dash Form, Website, and so on) |
| Conversion | Any, Not yet converted, or Converted |
| Email domain | Only addresses at particular domains |
You can't continue if the audience matches nobody ("This audience matches nobody. Broaden the filters before continuing.").
Step 3: Content
Template and values
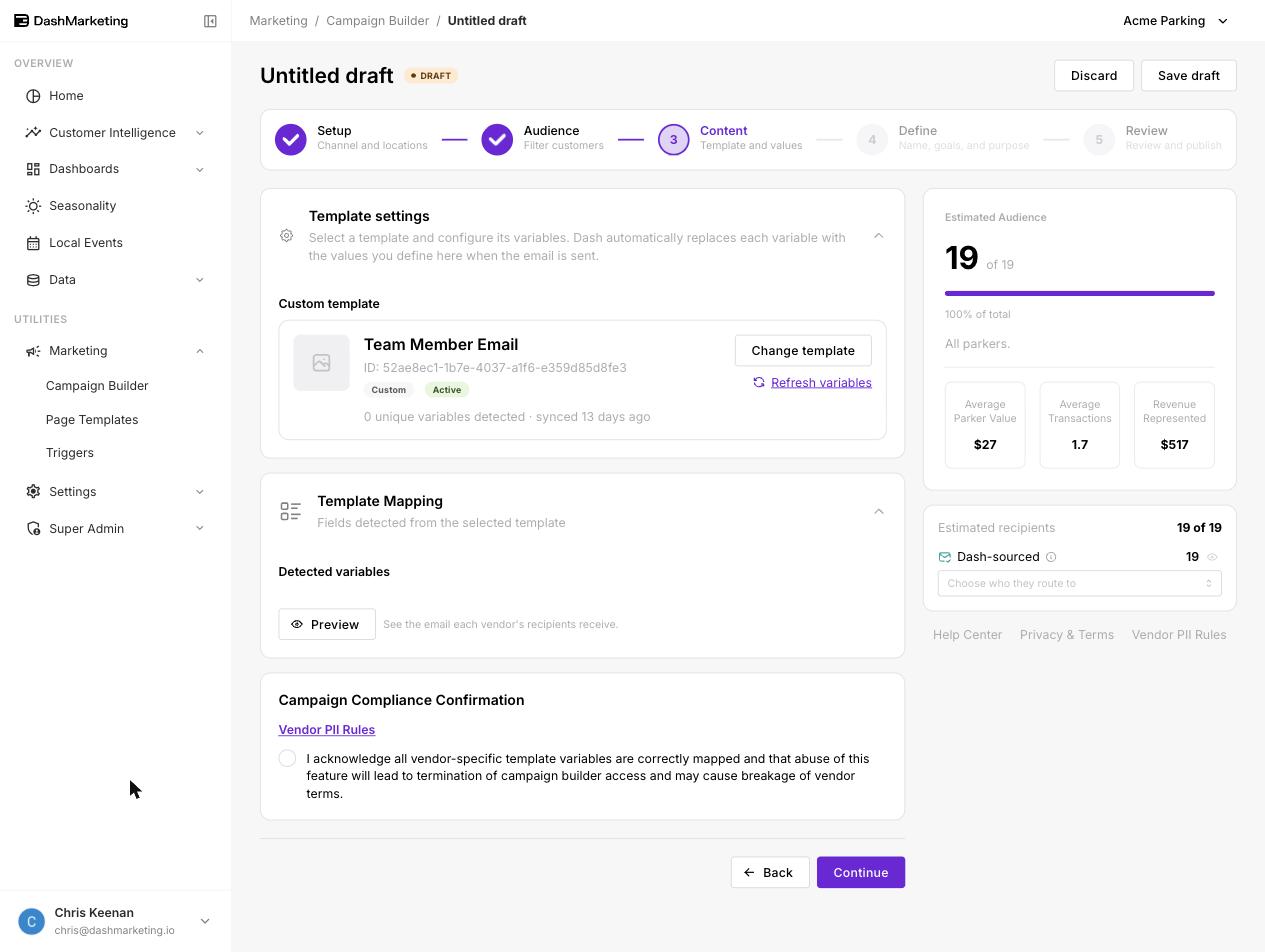
Choose your template
Under Template settings, click Choose your template to open Template selection. It lists every campaign-ready template assigned to your organization, with its name, ID, source and number of detected variables. You can search by name or ID and sort the list. Only SendGrid (Marketing) designs and templates built in Dash appear here.
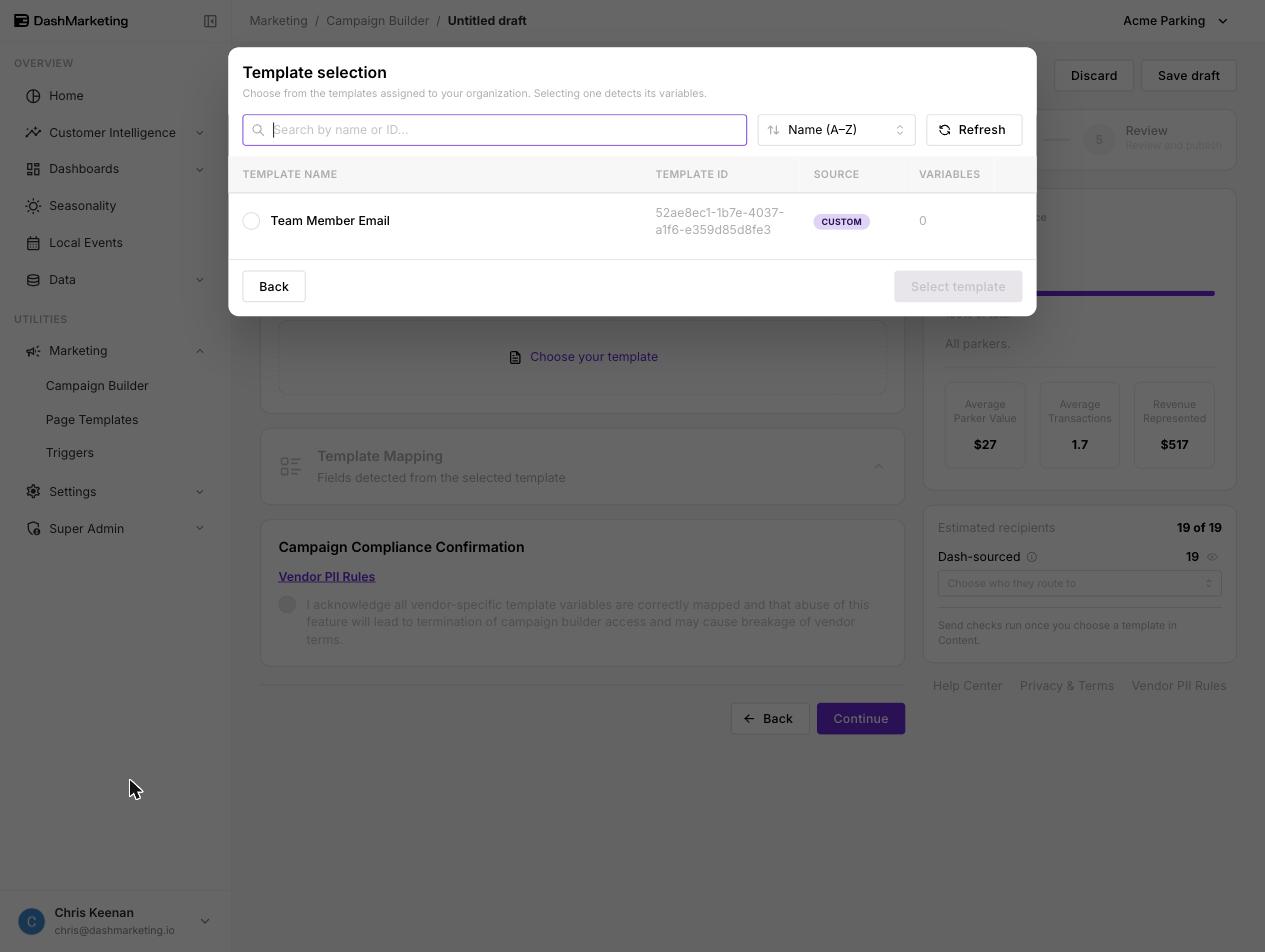
Pick one and click Select template. The card then shows the template's source, whether it's active, how many variables were detected and when it last synced. Change template swaps it. Refresh variables re-reads the template, so use it after editing the template.
If your organization has no campaign-ready templates, the picker says so. Build one under Settings › Email Templates, or ask Dash to assign a SendGrid (Marketing) design.
Map every variable
Under Template Mapping › Detected variables, each {{variable}} in the template gets its own card. Every variable must be mapped before you can continue. Choose a Source for each one:
| Source | Fills with | Notes |
|---|---|---|
| Recipient property | Something about the recipient: Email, First name, Last name, Full name, Phone number, City or State | Choose under Which property |
| Booking link | The booking link for the campaign's location, matched to each recipient's vendor | Only for One location campaigns. Links come from the location's Vendors tab. |
| Promo code | A code you enter | Set a baseline Code and, if needed, a different code for each vendor. A reused badge warns you when another campaign uses the same code. |
| Custom value | Text you type | Set a baseline Value, with optional per-vendor overrides |
When a value is missing. For Recipient property and Custom value, either turn on Skip recipient if empty or enter a Fallback value (for example, "there" for a missing first name, so the email reads "Hi there"). Booking link and Promo code always skip recipients who have no value, so nobody receives a broken link or an empty code.
Each card shows a status: Not mapped, Incomplete, Mapped, Mapped • N overrides, Partly mapped or No value. If you map a variable and then remove it from the template, the card warns you and the mapping is dropped the next time you save.
Preview
Preview ("See the email each vendor's recipients receive") opens Delivery preview. It shows the subject line and the email with your values filled in, on the Preview, HTML source and Plain text tabs.
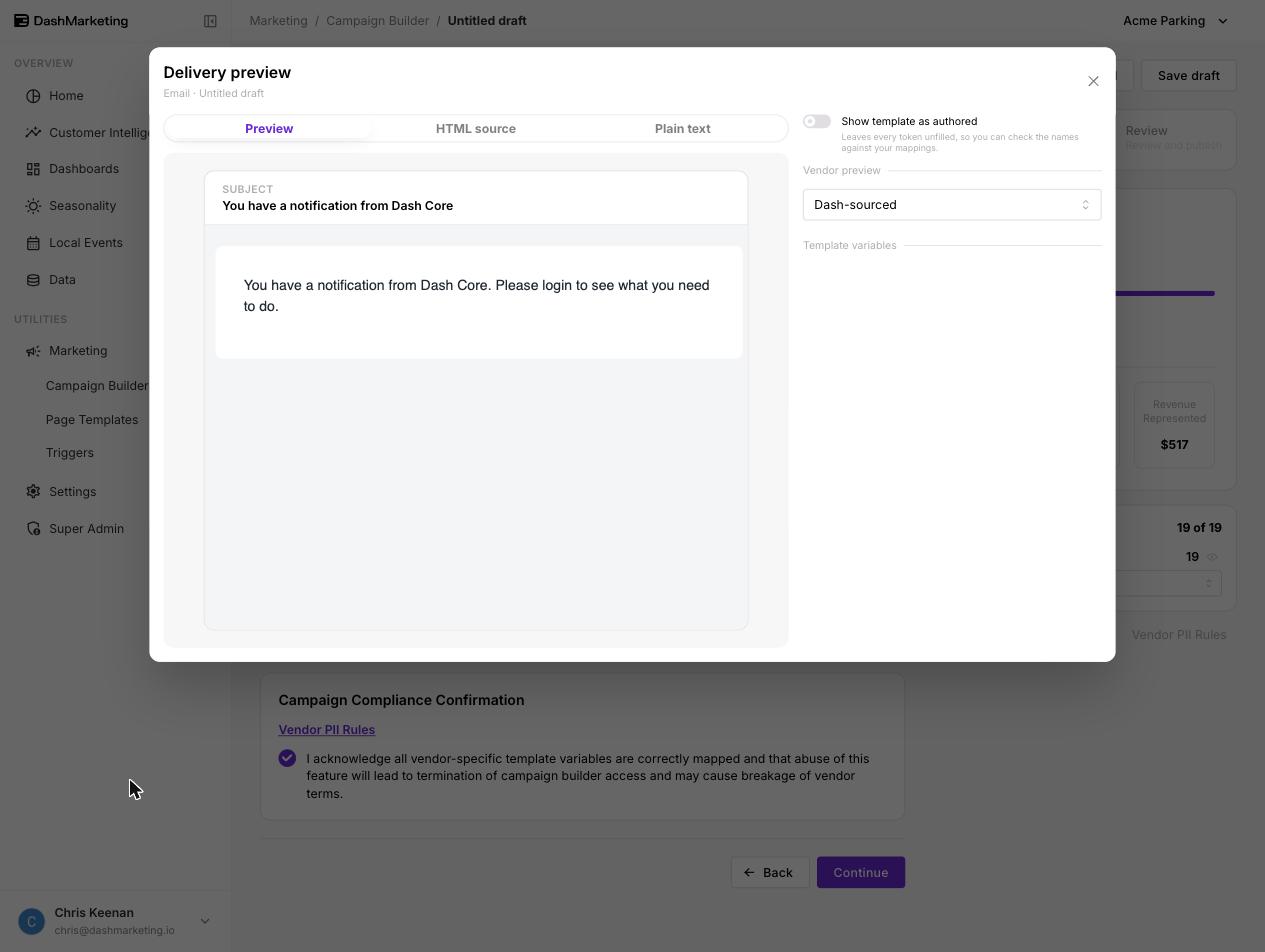
On the right:
- Vendor preview switches between each vendor's version of the email.
- Show template as authored leaves every variable unfilled, so you can check the names against your mappings.
- Template variables lists what each variable resolves to. When the template has variables, Simulate missing shows what happens when a recipient's data is missing.
Check every vendor's version before you submit.
Campaign Compliance Confirmation
Before you can continue you have to tick the confirmation:
I acknowledge all vendor-specific template variables are correctly mapped and that abuse of this feature will lead to termination of campaign builder access and may cause breakage of vendor terms.
Read the Vendor PII Rules first. The tick clears whenever you change the template or a mapping, and when you reopen the campaign later, so you confirm what is actually being sent.
Step 4: Define
Name, goals, and purpose
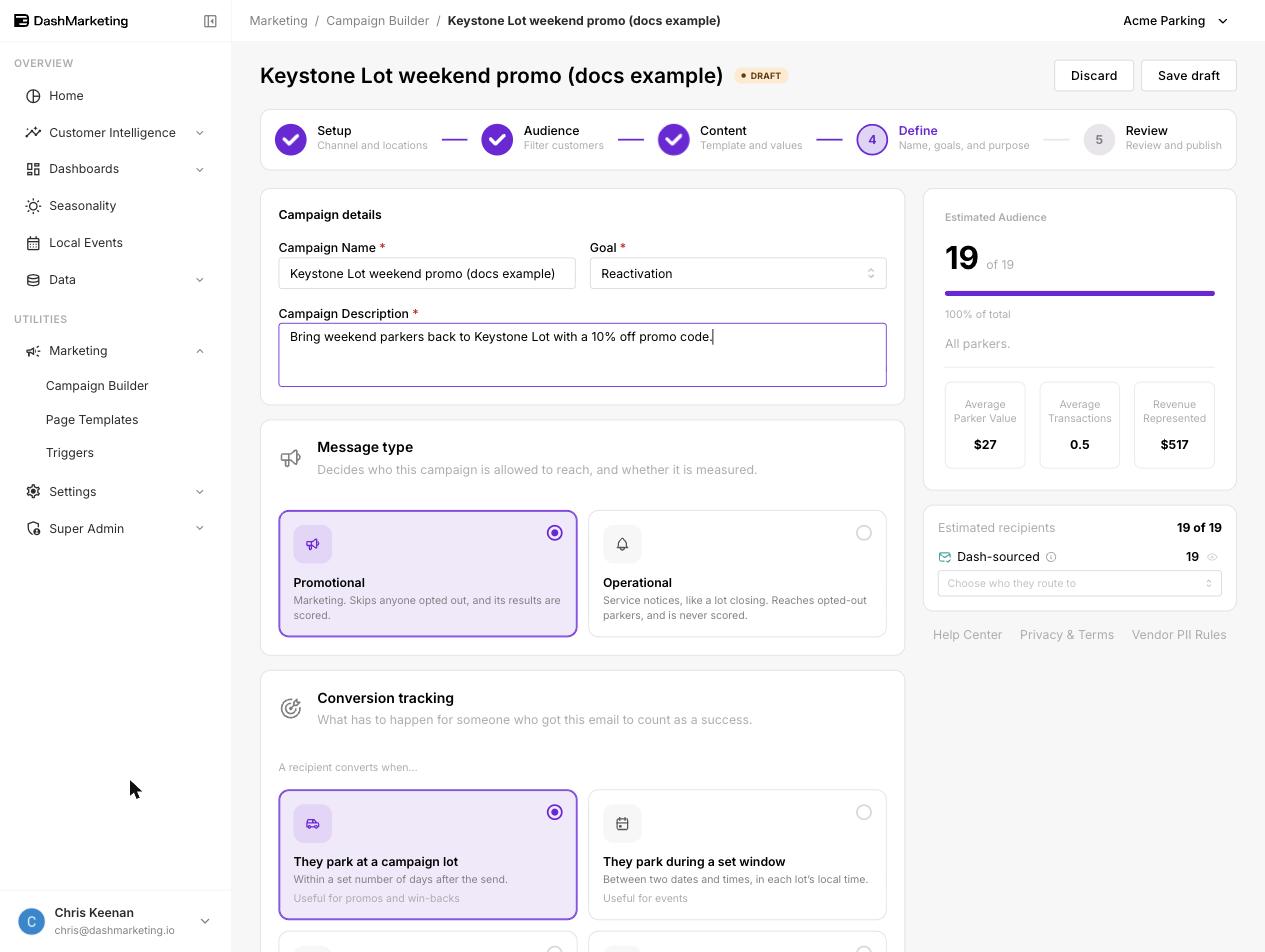
Campaign details
| Field | Guidance |
|---|---|
| Campaign Name | Required. Be specific: "Championship Game — Stadium Garage T-5" rather than "October email". |
| Goal | Required. The kind of campaign, such as Reactivation (default), Newsletter, Promotion or Loyalty. |
| Campaign Description | Required. What the campaign is trying to achieve. The Dash reviewer reads this. |
Message type
Decides who this campaign is allowed to reach, and whether it is measured.
| Type | Use it for | Opt-outs | Scored |
|---|---|---|---|
| Promotional (default) | Marketing: offers, events, reactivation | Skips anyone who has opted out | Yes |
| Operational | Service notices, such as a lot closing or a rate change | Reaches opted-out parkers | No |
Operational campaigns can't use promo codes or booking links, and must use Send directly. Only use Operational for real service messages. Sending marketing as Operational breaks your recipients' opt-out choices.
Conversion tracking (Promotional only)
What has to happen for someone who got this email to count as a success.
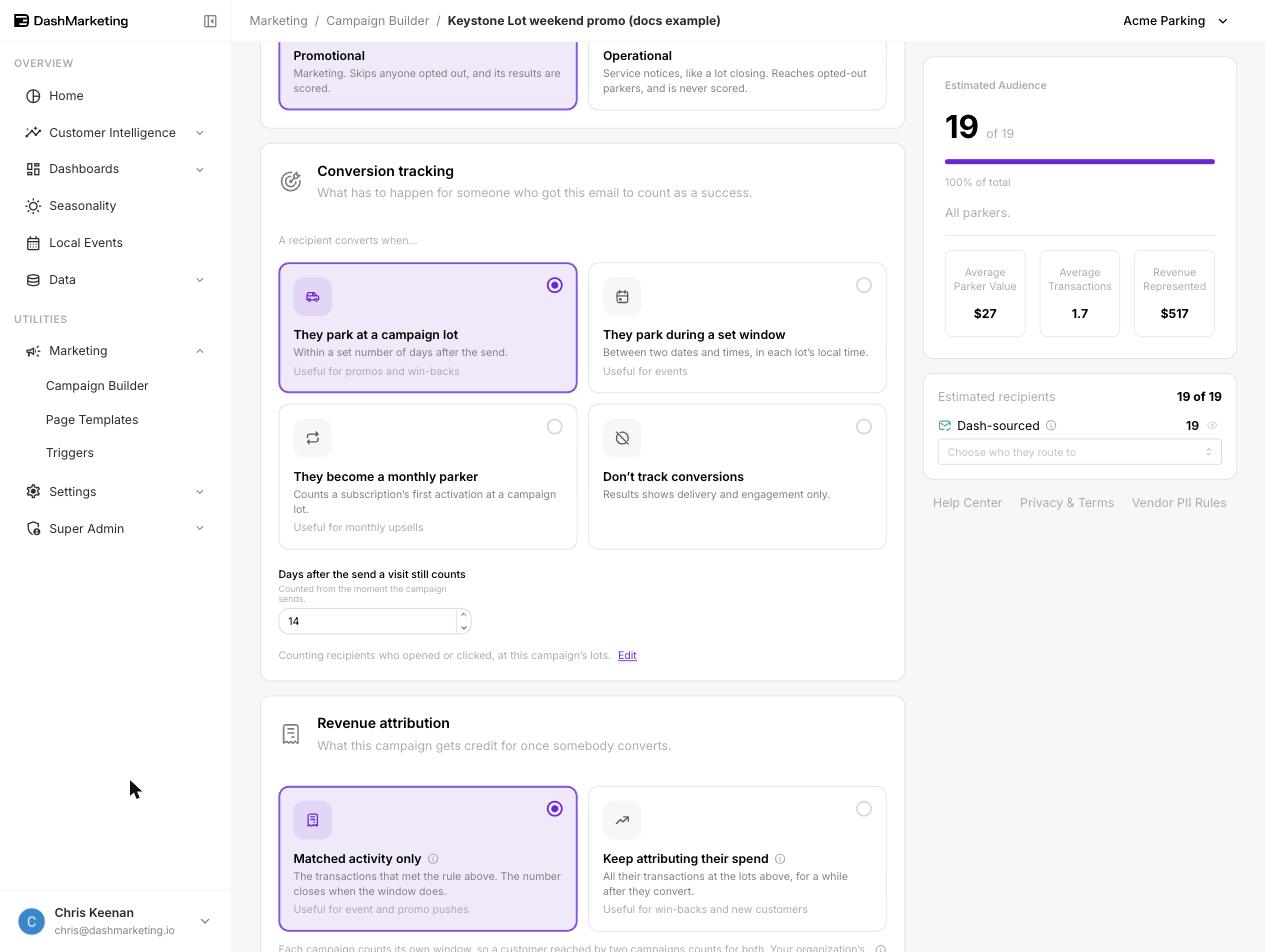
A recipient converts when…
| Parkers | Leads |
|---|---|
| They park at a campaign lot: within a set number of days after the send (Days after the send a visit still counts, default 14). Good for promos and win-backs. | They become a customer within N days |
| They park during a set window: between two dates and times (Window opens / Window closes), in each lot's local time. Good for events. | The event-window equivalent |
| They become a monthly parker: counts a subscription's first activation at a campaign lot (default 30 days). Good for monthly upsells. | They become a monthly parker |
| Don't track conversions: results show delivery and engagement only | Don't track conversions |
Under the options, a line summarises who is counted, for example "Counting recipients who opened or clicked, at this campaign's lots." Click Edit to change it:
- Count it for…: Recipients who opened or clicked (default, stricter), or Anyone this campaign was sent to.
- …when they park at: This campaign's lots (default), or Any of our lots.
Using a promo code from the campaign always counts as a conversion, even if the recipient's open wasn't tracked.
Revenue attribution
What this campaign gets credit for once somebody converts.
- Matched activity only (default) credits the campaign with the transactions that met the conversion rule, and stops counting when the window closes. Good for event and promo pushes.
- Keep attributing their spend credits the campaign with all of the converted recipient's transactions at the campaign's lots for a while afterwards (up to 12 months). Good for win-backs and new customers.
Products that count limits attribution to particular parking products. Each campaign counts its own window, so a customer reached by two campaigns counts towards both. Your organization's revenue total still counts each transaction once.
Delivery
How the email leaves through SendGrid, and who it comes from.
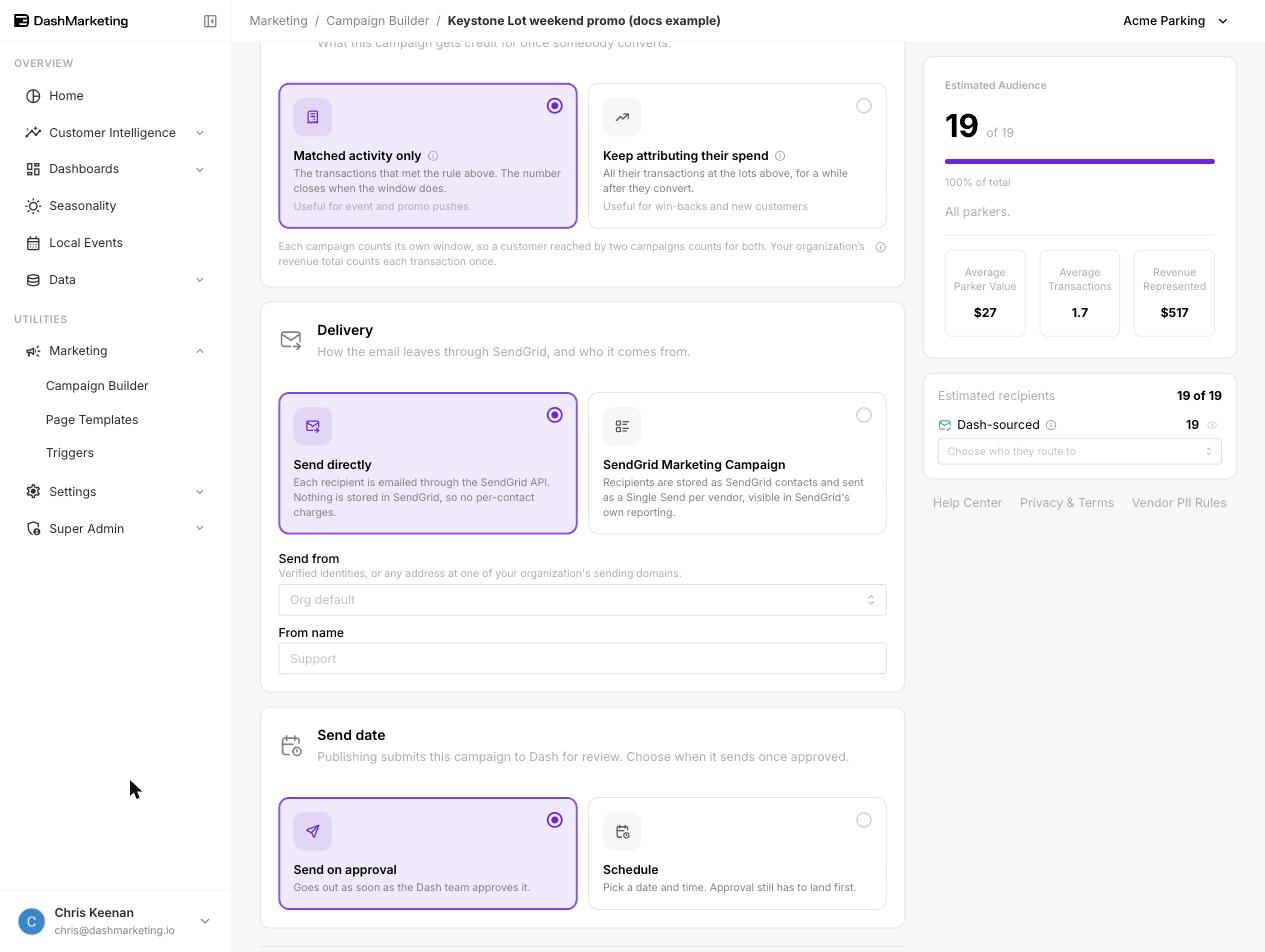
| Option | How it works |
|---|---|
| Send directly (default) | Each recipient is emailed through the SendGrid API. Nothing is stored in SendGrid, so there are no per-contact charges. |
| SendGrid Marketing Campaign | Recipients are stored as SendGrid contacts and sent as a Single Send for each vendor, so the send also appears in SendGrid's own reporting. Tick Delete the contacts from SendGrid after the send to remove the uploaded contacts once it's gone out. Requires an unsubscribe group on your integration, which the Dash team sets up. |
Send from: leave it on Org default to use your organization's default sender, or choose one of your verified identities or any address at one of your sending domains. Then set the From name. If your organization has a single fixed sender, this shows "Sending from … Contact Dash to send from a different identity." Replies go to the reply-to address on your email integration.
Send date
Publishing submits this campaign to Dash for review. Choose when it sends once approved.
| Option | When it sends |
|---|---|
| Send on approval (default) | As soon as the Dash team approves it |
| Schedule | At the Send at date and time, read in the Time zone you choose (defaults to your browser's). Approval still has to happen first. |
If you schedule a send, leave time for review. A campaign that's approved after its scheduled time goes out as soon as possible, but if it's more than two hours late it's rejected automatically so a stale message doesn't go out. See Approval, Sending & Results.
Step 5: Review
Review and publish
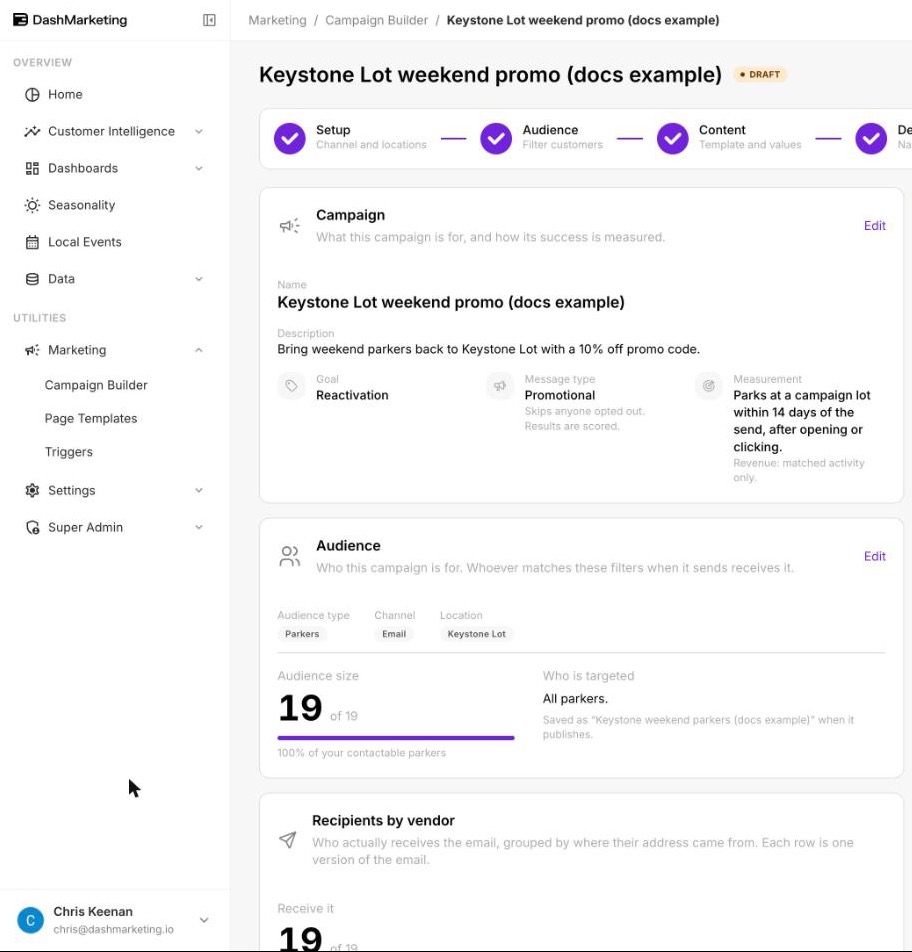
Review brings everything together in read-only cards, each with an Edit link back to its step:
- Campaign: name, description, goal, message type and how it's measured
- Audience: audience type, channel and location, the audience size, who is targeted, and the name the audience will be saved under
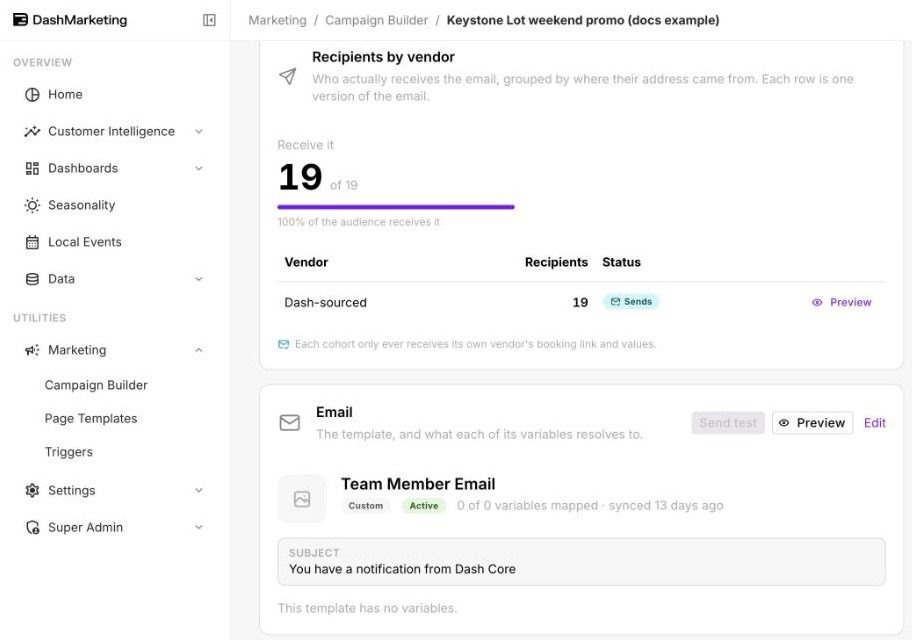
- Recipients by vendor: how many people will receive the email, and each vendor's recipient count and status. The status is Sends, or Excluded, Not available, Blocked, Needs a template or Skipped. Each vendor gets only its own booking link and values.
- Email: the template and subject, with Preview and a table of every variable, its source, value and what happens if it's missing
- Delivery: when it sends, time zone, From and Reply-to
The panel on the right says Ready to submit or Not ready yet, when the campaign will send, how many people in the audience will receive it ("Receive it: N of M in the audience"), and a checklist. Anything unfinished has a Fix link that takes you to the right step. It also flags setup problems outside the builder, such as a missing bulk sender or unsubscribe group. Below it, What happens next? outlines the stages after you submit.
When everything is green, click Submit campaign for approval. You'll see "Submitted for approval" and the status changes to Awaiting review. From here the campaign is locked. You can still change its name and description with Edit name and description, but nothing else. Next: Approval, Sending & Results.
Worked example: Championship Game
| Step | Setting | Value |
|---|---|---|
| Setup | Audience type | Parkers |
| Setup | Where | One location: Stadium Garage |
| Audience | Audience name | Stadium event & weekend parkers |
| Audience | Location(s) | Stadium Garage, Main Street Garage |
| Audience | Active within | Last year |
| Audience | Visit days | Sat, Sun |
| Content | Template | Game Day Parking (SendGrid Marketing) |
| Content | {{first_name}} | Recipient property › First name, fallback "there" |
| Content | {{booking_link}} | Booking link |
| Content | {{promo_code}} | Promo code GAMEDAY10, with a different code for one vendor |
| Define | Goal / Message type | Promotion / Promotional |
| Define | Conversion | They park during a set window: game day, 8 AM–11 PM, opened or clicked, this campaign's lots |
| Define | Delivery | Send directly, from ACME Parking events@acmeparking.com |
| Define | Send date | Schedule: five days before kickoff, 10:00 AM America/New_York |
Was this page helpful?